Signing up on Skidmore Domains

Reviewing the Guidelines

Before you get started, we recommend that you review our information about Choosing a Domain Name.

The Sign-Up Process (2 Options)

Once you’ve reviewed the guidelines, you can proceed to the sign-up page.

Click on the right hand side where it says Dashboard.

You will be redirected to login for verification. You will use your Skidmore username and password to login.

Option 1: Free Subdomain

If you wish to create a free subdomain of domains.skidmore.edu, leave this default option selected and enter in the subdomain you want for your Skidmore Domains website. When you’ve found an available subdomain, click the button labeled Click to Continue.

You will be brought to the sign up page. Since you selected the subdomain option, you should see that it is available for free.

Read the Terms of Service. To continue, you will need to check the box to agree to the Terms of Service and select Register Now.

After you click “Register Now”, you will be brought to the cPanel and are on your way to creating your ownSkidmore Domains space.

Applications Available in Installatron

Installatron, the script installer that is part of the domains.skidmore.edu cPanel, allows you to easily install Web applications to your Web space. Below is a list of all of the applications currently available to you through Installatron:

Community Building

  • Vanila Forums
  • MediaWiki
  • ExtCalendar
  • phpScheduler
  • WebCalendar
  • phpFreeChat
  • phpMyChat
  • Dada Mail
  • PHPlist
  • Site Recommender
  • FluxBB
  • MyBB
  • phpBB
  • Simple Machines
  • XMB Forum
  • Elgg
  • Oxwall
  • Pligg
  • GBook
  • Lazarus Guestbook
  • DokuWiki
  • PmWiki
  • WikkaWiki

Content Management

  • WordPress
  • Drupal
  • Omeka
  • b2evolution
  • Geeklog
  • PivotX
  • Serendipity
  • Textpattern
  • CMS Made Simple
  • concrete5
  • Contao
  • ImpressPages
  • liveSite
  • Nucleus CMS
  • phpwcms
  • PyroCMS
  • SilverStripe
  • Soholaunch
  • TYPO3
  • WebsiteBaker
  • Chamilo
  • Moodle
  • phpMyFAQ
  • Code Igniter
  • Coranto
  • MODx
  • e107
  • Joomla
  • Mahara
  • Mambo
  • ocPortal
  • PHP-Fusion
  • PHP-Nuke
  • Tiki Wiki CMS Groupware
  • Xoops
  • Zikula

e-Commerce and Business

  • OpenX
  • OSClass
  • Quicksell Classifieds
  • FrontAccounting
  • OrangeHRM
  • Feng Office
  • SugarCRM
  • Vtiger
  • Zurmo
  • CubeCart
  • Magento
  • OpenCart
  • osCommerce
  • PrestaShop
  • TomatoCart
  • Zen Cart
  • BoxBilling
  • phpCOIN
  • Simple Invoices
  • WHMCS
  • Collabtive
  • Mantis
  • PHProjekt
  • Crafty Syntax Live Help
  • Help Center Live
  • HESK
  • osTicket

Photos and Files

  • ownCloud
  • Gallery
  • GQ File Manager
  • OpenDocMan
  • Power File Manager
  • ProjectSend
  • Coppermine
  • Piwigo
  • TinyWebGallery
  • ZenPhoto

Surveys and Statistics

  • Aardvark Topsites
  • Advanced Poll
  • LimeSurvey
  • phpESP
  • Simple Poll
  • phpMyCounter
  • Piwiki
  • Seo Panel

Miscellaneous

  • YOURLS
  • Tiny Tiny RSS
  • PHPLinks
  • SiteBar
  • iTron Clock
  • WebCards
  • Contact Form
  • Form Tools
  • phpFormGenerator
  • webtrees
  • Feed on Feeds
  • selfoss
  • Search Engine Project

Choosing your domain name

Choosing your domain name is the first step in getting started with staking your claim on the web. Your domain name is really just a unique Web address that can be used to build out your own digital presence. As you make your choice, there are a few considerations to keep in mind:

Your Domain Name Must Be Available: Domain names must be unique, which means in order for you to claim your own, you need to be sure that it is currently available (and not being used by any one else or any company or organization). There are lots of tools to check on domain availability, and when you sign up on domains.skidmore.edu, we’ll actually check the availability of your choice for you. If you’d like to spend some time thinking about your choice and checking availability before you actually sign-up, we recommend using whois.net.

You Must Choose a “Top Level Domain” or TLD: The TLD is the suffix (or ending part) of your domain name. On domains.skidmore.edu, we only allow you to choose from 5 TLDs: .com, .net, .org., .info. and .us. You must choose which one you want to use (and the availability of your domain may depend upon the TLD you choose). Historically, .com domains were meant for businesses and commercial entities. On the other hand, .org domains were usually used by non-profit organizations. The .net domain was mean to be used by internet service providers. All of that said, the “historic” uses of these TLDs means very little anymore. You may find that .com domains are easier for people to remember, or you may like the “non-commercial” message of using a .org. The bottom line is that your choice of a TLD is entirely personal: just make sure that you choose one of the TLDs allowed by domains.skidmore.edu.

Choose a Domain You Can Live With: You should choose a domain name that you feel you can live with for quite some time. You should pick something that you won’t find embarrassing in the future. A good rule of thumb is to pick a domain that you would be comfortable putting on a future job application.

You May Wish to Include Your Name in Your Domain: There is no requirement that your domain reflect your specific identity in the form of your first and last name. However, choosing a domain name that includes your name may make it easier for you to achieve higher rankings in search engines when someone queries your real name.

Pick a Domain you Like: At the end of the day, your domain should reflect you. Pick a domain you like and are proud of. It can reflect your interests, sports you play, or your hobby. Or it could just be your name. The “right” domain for you is the one you’re comfortable with.

Installing Applications with Installatron

Installatron is a script installer that allows you to quickly and easily install Web applications to on the Web space. By default, when you use Installatron, the application you add will be automatically upgraded whenever a new version is available (and a backup will be kept, just in case).

Installing Applications Using Installatron

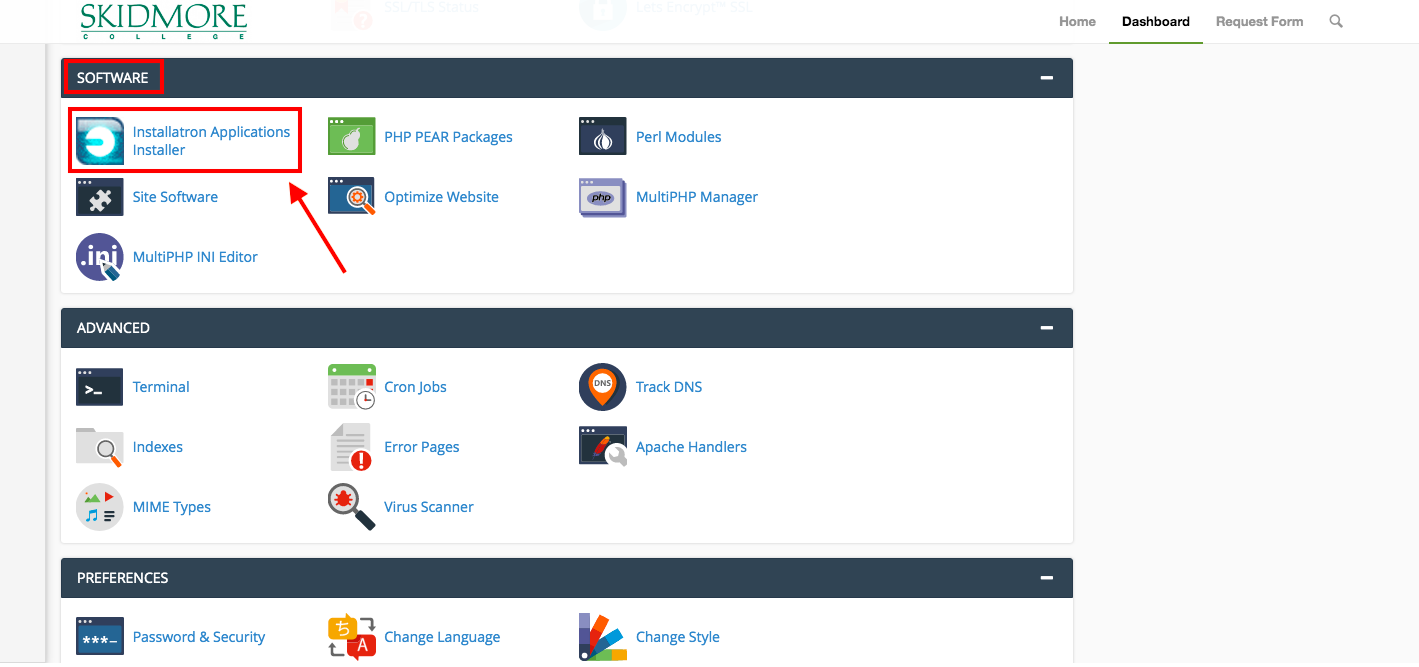
  • Once logged in you’ll be at the homepage of your control panel. You will need to scroll down until you see a section of the Control Panel labeled “Web Applications.” Within this section you will see a link to the Installatron which you should click.​ Or, you can type “installatron” (without quotes) into the search bar.  When you press enter you will automatically be redirected to the Installatron page.

  • When Installatron opens, you will see a list of any applications you’ve already installed. To install something new, click on the Applications Browser button (labeled with a large star).

  • A listing of all of the applications you can install be default in Installatron will appear. Browse to the one you want to install, and click the icon.
  • After clicking the icon, a page will appear with information about the application, links to resources, and a link to install it.

install window.001

  • Click “Install this application” when you are ready.
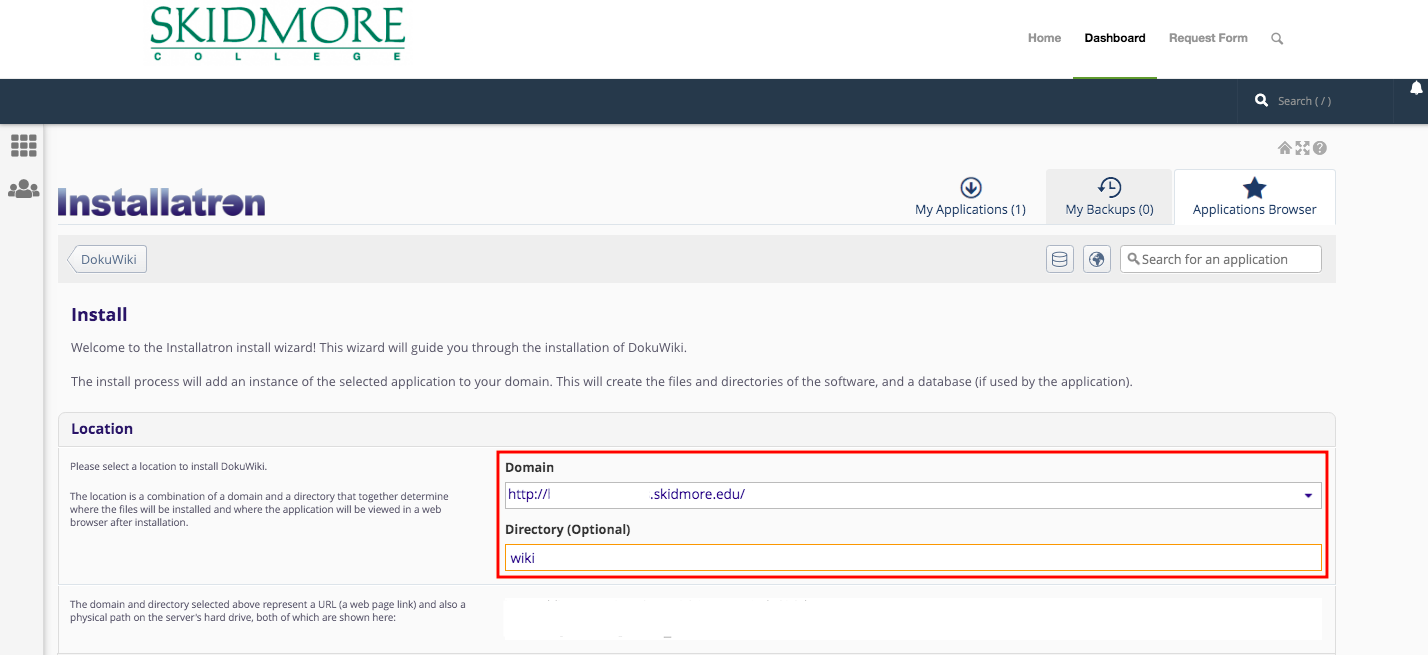
  • A page will appear with a number of settings you can choose/change. The image below shows these settings; here is a rundown of them:

  • Location: You’ll need to choose where to install your new application. You can install it at the root of your domain or in a subdomain (which you need to set up first). In addition, you can place your application in a folder (in either your root domain or a subdomain)
  • Version Information: You can choose a version of the application. Generally, we recommend choosing the default version. It is likely to be the most recent, stable release.
  • Updates & Database Management: By default, the system is set up to automatically upgrade (and create backups upon upgrading) all applications. In addition, by default, the database will be set up for you automatically. We recommend NOT changing these options.
  • Username/Password: An username/password will be automatically generated for you. You can choose to change this, if you like.
  • Website Title: Pick a title for the site that will be created when you install your application. You should change this from the default title! After installation, you’ll be taken back to the main Installatron page, with details about the application you just installed. At anytime you can come back here to review the application details, back it up manually, or uninstall it.

To get to your new site, you can click the “website” link. What’s more, with certain applications you can use this space to login to the admin area.

In addition, you’ll have received an email with your username/password and a link to your new site.

Registering a Domain

Skidmore Domains currently utilizes subdomains of .domains.skidmore.edu for the initial signup, however after using your space you may decide you’d like to register a top-level domain (a .com, .net, .org address). You can do this by registering a domain with a service provider (we make a recommendation below, but any domain provider should work) and adding it to your space as an Addon Domain.

To start you’ll need to get the domain registered. When choosing a domain we recommend keeping it all lower-case, avoiding hyphens, keeping it short, and of course it will need to be a unique address. Our service provider, Reclaim Hosting, has made the process of registering a domain quite simple, and the domain will work with very few additional steps due to the integration they have with our hosting system. To register a domain you would go to https://portal.reclaimhosting.com/cart.php?a=add&domain=register and type in the domain you’d like to purchase:

After ensuring the domain is available for purchase you’ll be prompted to select whether you’d like to protect the contact information associated with the domain. All domain registrations are required to have valid contact information publicly available, however a proxy service to protect your identity is available for an additional fee. You can read more about this service, ID Protect, at http://docs.reclaimhosting.com/FAQ/ID-Protect-FAQ/.

Screen Shot 2015-12-07 at 9.25.46 PM

You’ll also be prompted for nameservers for the domain. If registering the domain through Reclaim Hosting you can leave these with the default. If registering the domain elsewhere you’ll want to point the nameservers to ns1.reclaimhosting.com and ns2.reclaimhosting.com in order for the domain to work with our system.

Once you’ve completed the checkout process with payment information the domain will be registered automatically. The last step is to add it to your existing account here at Skidmore Domains. To do that you’ll log into your account at https://domains.skidmore.edu/dashboard and in cPanel navigate to Domains > Add-on Domains.

addon domains.001

Here you will type in the domain that you registered previously to host it within your space on Skidmore Domains. cPanel will also setup a subdomain which you can leave with the default that it creates and verify a location for the files for the domain (typically a folder inside of public_html). The option to create an additional FTP account is present but not necessary. Once the domain is entered click Add Domain to add the domain to your hosting account.

create an addon domain.001

At this point the domain will now be hosted in your account and you can use it to install software, upload files, and any number of other actions available to you in cPanel.

Migrating from SITES dot

If you’ve built a great website on Skidmore Domains but want to customize it beyond the available options, you can transfer it to Skidmore Domains. Using your own domain on Skidmore Domains gives you full creative control over your site’s appearance and the flexibility to add new functionality. In addition, Skidmore Domains domains are hosted through Reclaim Hosting, which provides a convenient migration service so you can keep your site after you leave.

Caution: All the content and media contained within your posts and pages can be migrated, but files in your Media Library, your theme, and any appearance settings will not transfer to your new WordPress site. You will have to set these up again once you migrate your content.

Export Your Site

Go to your cPanel and sign in to your account. Go to My Sites and click on the dashboard of the site you want to migrate.

Click on Tools > Export in the toolbar to the left. Select what you want to transfer, then download the export file.export.001

Install WordPress on your Skidmore Domains domain and go to your WordPress dashboard. You may want to delete the automatically generated example posts and pages (e.g. the “Hello world!” post).deleteposts.001

Import Your Site

In your Skidmore Domains WordPress dashboard, go to Tools > Import in the toolbar on the left. Choose WordPress from the list of systems.import.001

Click on Choose File and select the file you exported from SITES dot. Then upload the file and import it.import2.001

You will be asked to assign authors to the posts or pages you import. You can choose to keep and display the authors’ names from the SITES dot version of your content or change them to something else. Remember to update the passwords and roles of imported users once the migration is completed. If you want to keep the file attachments (image, video, document, etc. files uploaded into your posts from the post edit screen), be sure to check the import attachments box before you click Submit.authors.001

author2.001

Congratulations! The migration is complete and you can start customizing your new site on Skidmore Domains

Omeka

Installing Omeka

Omeka is an open-source web application that can be used to create and display online digital collections. Developed by programmers at George Mason University, Omeka was designed to be user-friendly, both during installation and setup and during daily usage. To install Omeka, use these simple steps:

  1. To get started you’ll need to login to your control panel (https://domains.skidmore.edu/dashboard) using your Skidmore username and password.

  1. Once logged in you’ll be at the homepage of your control panel. Navigate to the Web Applications section of the cPanel and find Featured Applications. Then select Omeka.
  2. This page gives you more information about the Omeka software. To begin the install click install this application in the upper-righthand corner. 
  3. On the next page the installer will ask for some information about this install. The first thing you’ll want to do is decide where to install it. If you’re wanting to install Omeka on your main domain, you can leave the directory area empty. If you created a subdomain, you can select it from the dropdown menu. You also have the option of installing Omeka in a subfolder by typing in the folder name in the Directory field. Click here for more information about subdomains and subfolders.

  1. By default the installer will automatically backup your website and update it anytime a new version comes out. While we recommend you keep this option, it is possible to only do minor updates, or turn them off completely. The installer will also create a database for you automatically, but if you’ve already created one for this website you can choose Let me manage the database settings and enter the details. Click Install to continue. 
  2. The installer will take just a few moments to install Omeka and a progress bar will keep you updated. When it is complete you will see a link to your new Omeka site as well as a link to the backend administrative section for your Omeka site. Click the website link to configure your new Omeka installation. 
  3. When you visit your new Omeka installation for the first time, you will be taken to the site configuration page. Enter a UsernamePassword, and Email for the administrative superuser (i.e. yourself).
    9422087925_cf7c86c725_o
  4. Under “Site Settings,” enter an Administrator Email and a Site Title. The Administrator email is the address that messages from the system (e.g. forgot password email reminder) will appear to come from. You might want to create a custom email address using these instructions, for example webmaster@yourdomain.com or omeka-admin@yourdomain.com, to use for this purpose. The Site Title will appear at the top of your visitors’ browser windows.
    9422087901_f1349b92bc_o
  5. Further down the Site Settings page are several numerical settings; you may leave these at the defaults if you are new to Omeka. When you are done making changes, click the Install button to submit the configuration page and proceed.
    9422087885_d63b931583_b
  6. Congratulations! Omeka is now installed. Use the buttons to either proceed to the Public Site, or to begin adding content, go to the Admin Dashboard.
    9422087847_242d03b60f_o

Installing Plugins

There are a variety of plugins that enable additional functionality in Omeka, but in order to easily add them you will first need to install Escher, a plugin installer. All the plugins available for Omeka and their descriptions can be found on this page.

1. Find the Escher plugin listing and click the red button on the right to download the Escher zip file.

omeka-plugins

2. Next, open up your cPanel Dashboard and click on the File Manager. You can find the File Manager under ‘Files’ or by typing “File Manager” in the upper right search bar.


3. Go to the public_html > omeka > plugins folder by clicking on the folder icons in the file menu, or by typing “public_html/omeka/plugins” into the navigation bar at the top and clicking ‘Go’.

file-mngr

4. Next you will need to upload the Escher zip file you downloaded into the plugins folder. Select the Upload option in the top menu to open up a new tab where you can upload the zip file. When the upload is complete, click the ‘Go back to home/yourdomain/public_html/omeka/plugins’ link at the bottom of the page to return to the File Manager. You will see that the Escher zip file has appeared in the plugins folder.

extract

5. Make sure the Escher zip file is selected (it should be highlighted in blue), then click Extract from the menu at the top of the page. A small window will open up to confirm where the file will be extracted to. If you were in the plugins folder, it should say public_html/omeka/plugins, if not, type that into the box before you hit Extract File(s).

extract2

6. Another window will open that outlines the contents of the file. Just hit the Close button and the installation will be complete.

extract3

 7. The Escher plugin should now be available in the plugins tab in your Omeka.

escher1

8. To use Escher to install other plugins, click on Escher in the left hand sidebar.

escher-2

9. Next, select the plugin you’d like to install from the dropdown menu and click the Upload button. The plugin will be installed and appear in the plugins page, which you can access from the menu at the top of the page. You will then have to turn on the installed plugin by hitting the Activate button.

escher-3

Using Omeka

You can learn how to use this application in the official Omeka Support Documentation. This support guide will help you get started and begin creating your Omeka site.

When You Leave

You will lose access to your Skidmore Domains domain six months after you graduate (or otherwise discontinue) from Skidmore. You can keep everything exactly the same while you still have access to your Skidmore email, which is for 6 months after graduation. However, when you lose access to your Skidmore email, you no longer have access to your Skidmore Domains cPanel.

You then have a number of options, with the ultimate goal to transition your account to one that is no longer managed by Skidmore or connected to your Skidmore email. 

The easiest option is to migrate your site off of Skidmore Domains directly to Reclaim Hosting. This option keeps everything exactly the same on the back end, but just moves your content over automatically from the Skidmore Domains servers to the Reclaim Hosting Customer servers. Reclaim Hosting will give you the option to purchase your own domain name (so it will no longer be yourdomain.domains.skidmore.edu) and it will migrate the site for you – easy peasy. You don’t have to do any of the migration work yourself. After that point, your contact for troubleshooting will be “support@reclaimhosting.com.” The most popular plan through Reclaim is $30/year for 2GB of space, which is a very competitive deal.

Other options are to download your entire site to store on your computer, move everything over to another hosting provider, or—if you use WordPress—to export your site’s content, import it to WordPress.com for free, and re-do some of the formatting that doesn’t transfer over. (More info here.)

Using Reclaim Hosting

Skidmore Domains is hosted through Reclaim Hosting, a company that started out of the University of Mary Washington. Through our special partnership with them, you’re eligible to have your domain and content automatically migrated to a full hosting account for free for the first year. See this link for more details.

Just sign up for your own domain, submit a support ticket, and they’ll do the migration for you. You won’t have to provide any login information since they control the servers on both sides.

To sign up for your own Reclaim Hosting domain:

1. Login to domains.skidmore.edu.

2. Go to Migration Information under Manage Your Account in the top navigation menu.

3. Click on Get Started in the Migration Offer box.

4. You will be given the option to 1) register a new domain, 2) transfer your domain from another registrar, or 3) use your existing domain and update your nameservers.domainname.001

If your site’s URL ends in domains.skidmore.edu, and you have never used a different URL or purchased hosting from somewhere else, the Register a new domain option allows you to get your own personal domain with Reclaim Hosting (outside of Skidmore Domains). Your site will no longer be located at “yoursite.domains.skidmore.edu” and you’ll be able to purchase a new URL.

If you have purchased (or intend to purchase) a URL from a different hosting company, but still want your site to be hosted with Reclaim Hosting, select the I will use my existing domain and update my nameservers option. Your site will be migrated to a personal Reclaim Hosting account, but then you will have to update the information that tells the other hosting company (that you got your URL from) where your site is located. It’s possible to get your hosting and URL from two separate companies, but it’s often easier and cheaper to get them together.

If you already have a site that’s hosted somewhere else, and want to transfer everything to a personal Reclaim Hosting account, select Transfer your domain from another registrar.

Other Hosting Providers

If you don’t want to continue with Reclaim and would rather use a different hosting company, you can download all your site files independently, purchase a URL, and upload the files to your new domain through FTP.

Mediawiki

MediaWiki is an open-source publishing platform that can be used for creating a collaborative document repository. It’s the software that drives the Wikipedia website. Setting up a MediaWiki install on your own domain can be done by following these steps:

  1. To get started you’ll need to login to your control panel (https://domains.skidmore.edu/dashboard) using your Skidmore username and password.

  1. Once logged in you’ll be at the homepage of your control panel. Navigate the Web Applications section of the cPanel and click View More for the Featured Applications. Then find and select MediaWiki.
  2. The next page gives you more information about the MediaWiki software. To begin the install, click install this application in the upper-righthand corner.
  3. On the next page the installer will ask for some information about this install. The first thing you’ll want to do is decide where to install it. If you’re wanting to install MediaWiki on your main (the root) domain, you can leave the directory area empty. If you created a subdomain, you can select it from the dropdown menu. You also have the option of installing MediaWiki in a subfolder by typing in the folder name in the Directory field. In this instance, we have opted to install it in a subdomain called mediawiki.createoutestdomain.com. Click here for more information about subdomains and subfolders.
    (By default the installer will automatically backup your MediaWiki website and update it anytime a new version comes out. While we recommend you keep this option, it is possible to only do minor updates, or turn them off completely. The installer will also create a database for you automatically, but if you’ve already created one for this website you can choose Let me manage the database settings and enter the details.)
  4. Finally, you’ll need to create an initial username and password for the WordPress install. Enter that information in final section and click Install (Note: A default username and password are provided for you.)
    The installer will take just a few moments to install WordPress and a progress bar will keep you updated. When it is complete you will see a link to your new MediaWiki site as well as a link to the back end administrative section for your MediaWiki site.

6. Congratulations, you have now completed the installation of MediaWiki! You can now start to create collaborative documents on your own domain.

Managing Permissions

The default Mediawiki installed has been customized to make it a bit harder for spammers to overwhelm wikis with illegitimate content and comments. This is done by modifying the LocalSettings.php file (a file that is included in every install in which it is possible to provide configurations details).

By default, Mediawiki allows anonymous users to create pages and edit pages in the wiki. The modifications change this in the following ways:

  • Anonymous users cannot edit existing pages
  • Anonymous users cannot create pages
  • Registered users must click the confirmation link in the registration email in order to edit or create pages

This approach should drastically reduce unsolicited content and comments on Mediawiki installations. One further step that administrator might take is to turn registration off after a predetermined amount of time. Users must create accounts by this date; after that, the settings are changed so that registrations are no longer open.

To add this setting, you must edit LocalSettings.php in your Mediawiki install:

  1. Login to cPanel and browse to your File Manager.
  2. In the File Manager, browser to the folder within publichtml that contains your Mediawiki install. If you installed the wiki at the root of your domain, you won’t need to go any further than publichtml. If you installed the wiki in a subdomain or subdirectory, you’ll need to find the directory that is associated with that space.
  3. Locate LocalSettings.php and click the Edit or Code Editor icon at the top of the File Manager.
  4. Browse to the bottom of the document, and locate the custom settings that were added during the Mediawiki install and the line “$wgGroupPermissions[‘*’][‘createaccount’] = false;”
    11953831465_8e29aea940_z

Using MediaWiki

You can learn how to use this application at the official MediaWiki Help Pages. This support documentation wiki will show you how to manage all aspects of your wiki, including customizing its appearance, editing content, and changing user settings.

Backup Wizard

The cPanel has a Backup Wizard that lets you easily backup and restore all or parts of your domain files and databases.

  1. Login to domains.skidmore.edu.
  2. In the Search Box at the top of the page, search for “Backup Wizard”, or under Files click on Backup Wizard.
Skidmore Domains docs edits.001

backup wizard

3. If you click the “Backup” button, you will have the option to create a full or partial backup. A full backup will create an archive of all the files and configurations on your website. You can only use this to move your account to another server, or to keep a local copy of your files. You can’t restore full backups through your cPanel interface. In order to restore files, you’ll need to download partial backups.