Setting Up FTP

There may be times when you need to place files onto your space on your Web server. There are a number of scenarios when this might be necessary:

  • You’re working with an application that allows you to install plugins/extensions, but the files need to be manually moved to the server in order to add them. (Note: This is NOT required with WordPress which allows you to install plugins through the backend in your browser.)
  • You’ve developed a custom site/pages using a Web design program, and you need to upload the files you created to the server
  • You’re installing an application that isn’t part of the applications in Installatron.

One way to upload files is by using the File Manager that is part of cPanel. However, sometimes you’ll find it easier/necessary to use FTP, or File Transfer Protocol, to move files to the server. This can be particularly useful if you’re working with a Web space where you’re not the owner (so you don’t have access to the File Manager in cPanel) or if you need to provide file access to someone else to your space on the Web server.

What exactly is FTP?

File Transfer Protocol is a method that allows you to remotely move files to a Web server from another location – usually your local/personal computer. Using a pre-defined FTP account (with a username and password), you can configure an FTP client (a program you run on your computer that allows you to transfer files via FTP.

There are lots of FTP clients that you can use; some are free and some are not. A few free ones you might consider:

For the purpose of this tutorial, we’ll show you how to set up FTP in FileZilla, but you should be able to generalize these instructions to use in any FTP client.

Get Information about Your FTP Account

If you’re FTPing to your own space on the Web server, or if you’re setting up an FTP account for someone else to use to FTP to your space, you’ll need to start by getting information about the FTP credentials from cPanel:

  1. Login to domains.skidmore.edu.
  2. In the Search Box at the top of the page, search for “FTP”, and click the FTP Accounts icon that appears.ftp accounts.001
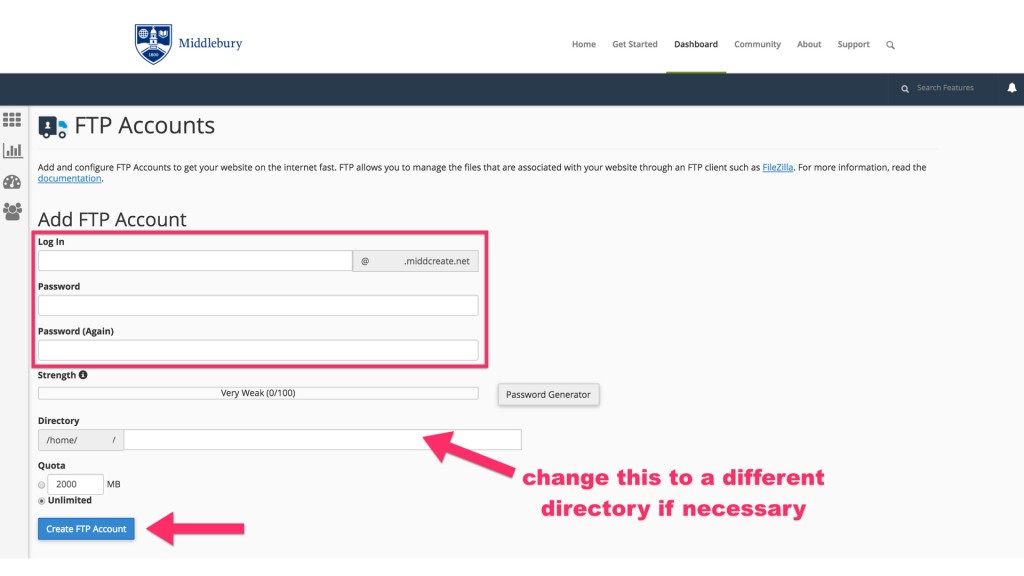
  3. You’ll have the option to create a new FTP account, or you can scroll down the page to find the credentials for the default FTP account. If you want to create an account, fill out the Add FTP Account form with a username and password. By default, the new FTP account will be limited to a directory with the same name as the account you’re creating. You can change this to a different directory, if you want to grant this account access to a different location.  NOTE: Make sure you know/remember the password you enter. When you’re done, click Create FTP Accountcreate ftp account.001
  4. Once you’ve created the new account, you’ll see it appear in the list at the bottom of the FTP Accounts page. In addition to any accounts you’ve created, in the Special FTP Accounts section, you’ll see the default FTP Account. You’ll know this account because the username corresponds to your cPanel username. This FTP account has full privileges to access any space on your Web server. ftp account name.001
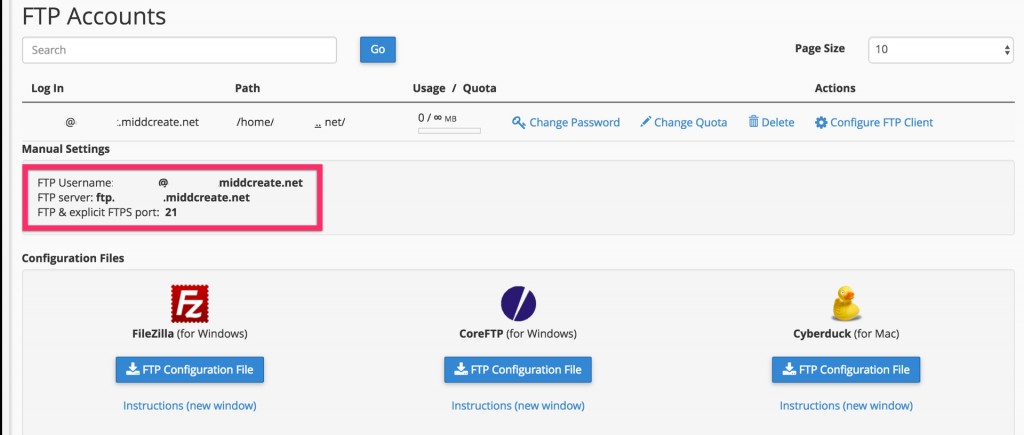
  5. For whichever account you need credentials for, click the Configure FTP Client link.
  6. Write down the username, server, and port information that appears. You will need to use this (or you will need to provide this to the person you are giving FTP access) along with the password you created in Step 3 in order to configure your FTP client. ftp configuration.001
Configure FTP in Your FTP Client

Below are links to tutorials for setting up both FileZilla and CyberDuck to connect to you FTP account.
Creating an Email Address

Creating an email address in the control panel creates a mailbox on the server for mail to be delivered to. In some cases this might be desired if you want to maintain full control of the email you receive, however in many cases users may wish to simply create an Email Forwarder that sets up a custom email address and sends all mail sent to it on to the address of your choice. This article will show you how to setup both methods.

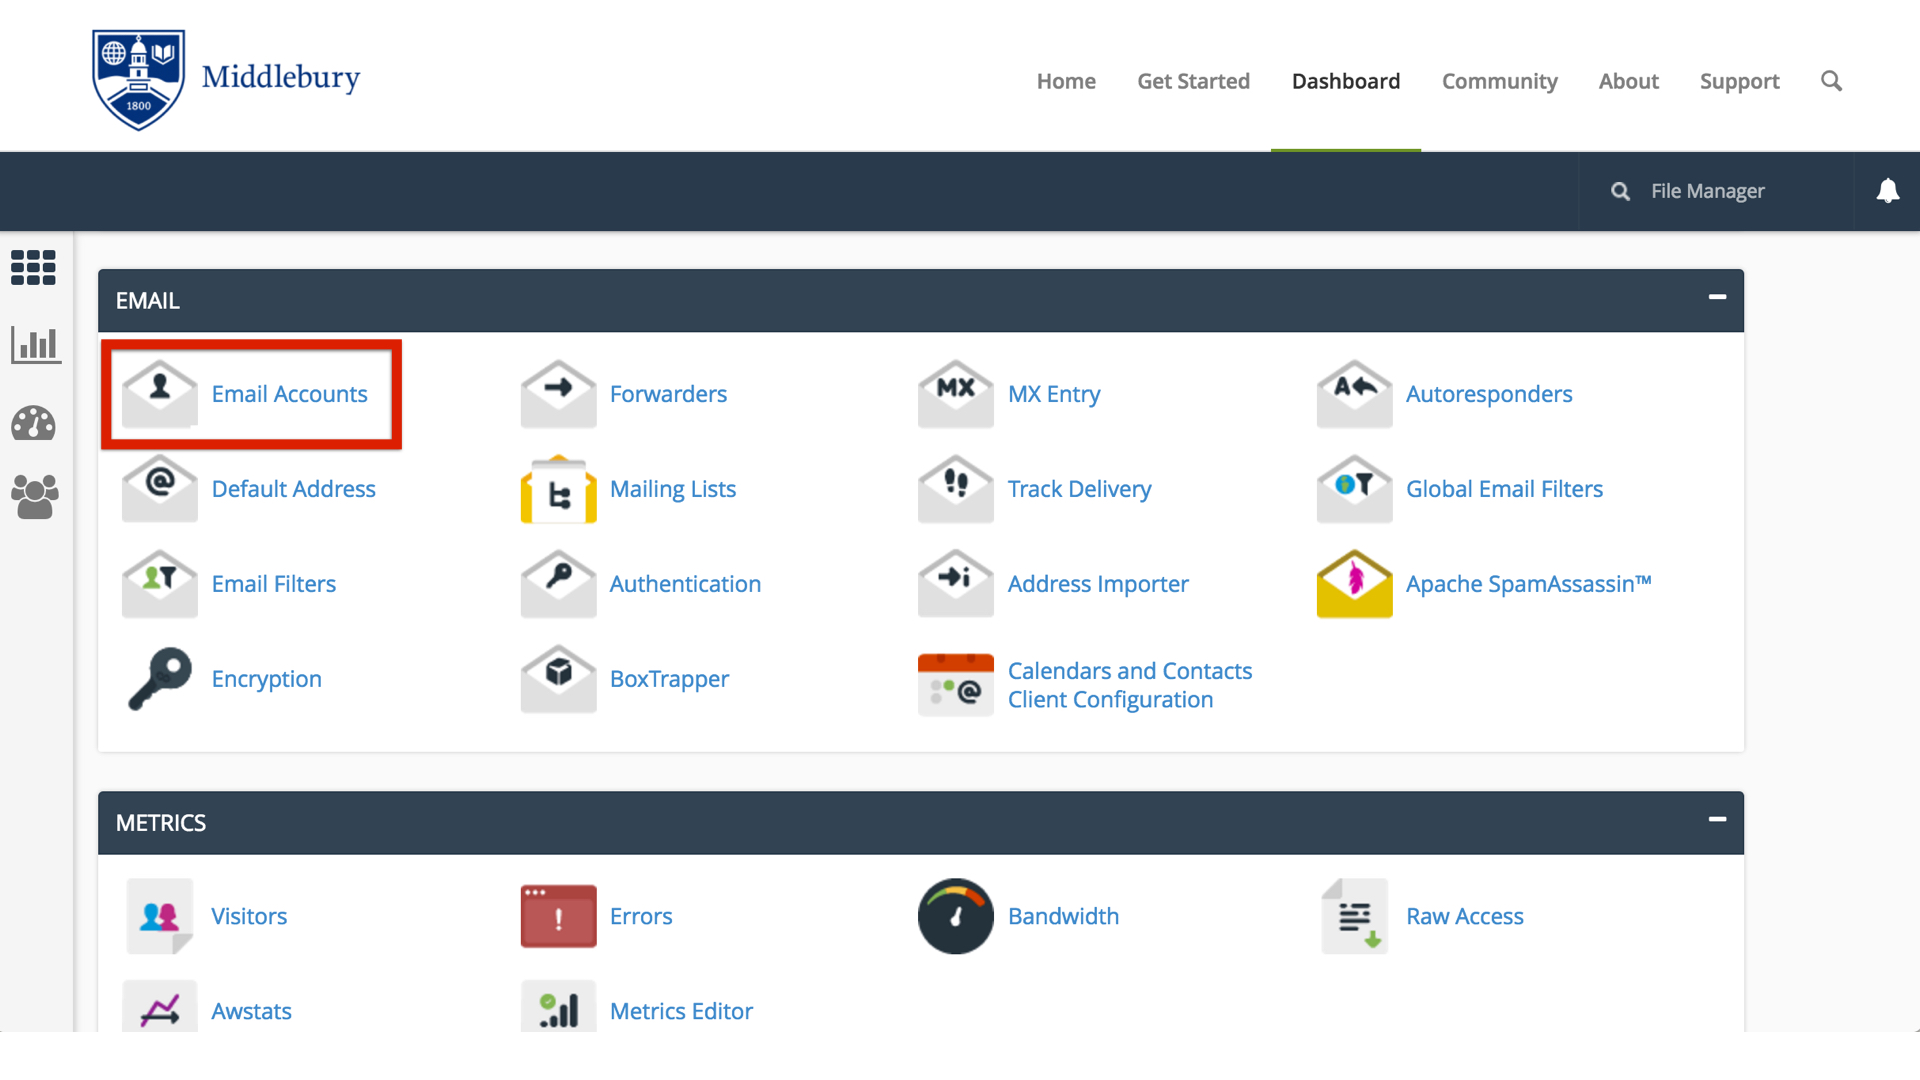
  • On the homepage of the control panel you will see a section titled Email that contains several tools for setting up email addresses. To get started let’s go to the Email Accounts page.email.001

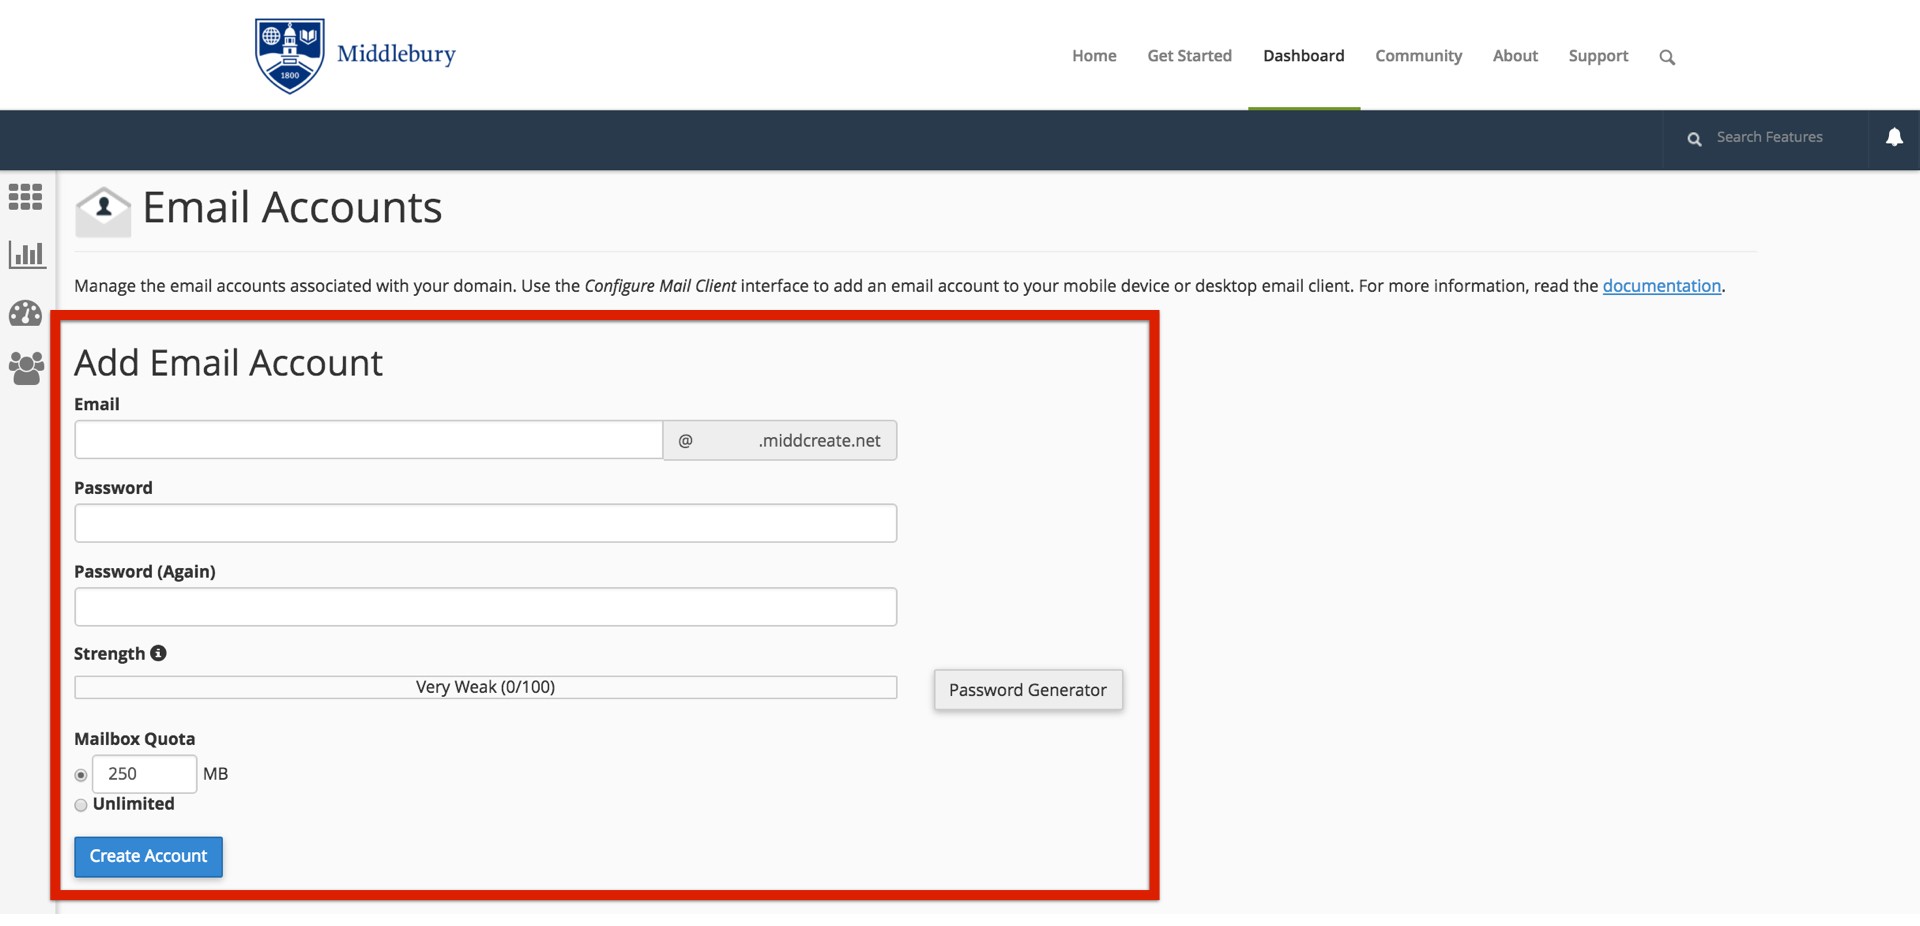
This screen will allow us to setup an email address that uses a mailbox stored on the server. You will be able to access mail sent to this email address either through a webmail client or a desktop/mobile client directly. Enter the desired email address as well as a password to associate with that email address. You can choose to set a quota for how large of a mailbox you need, or set this to unlimited (keep in mind your quota will still be dictated by the limits of the hosting account). Once you’re done click Create Account.email setup.001

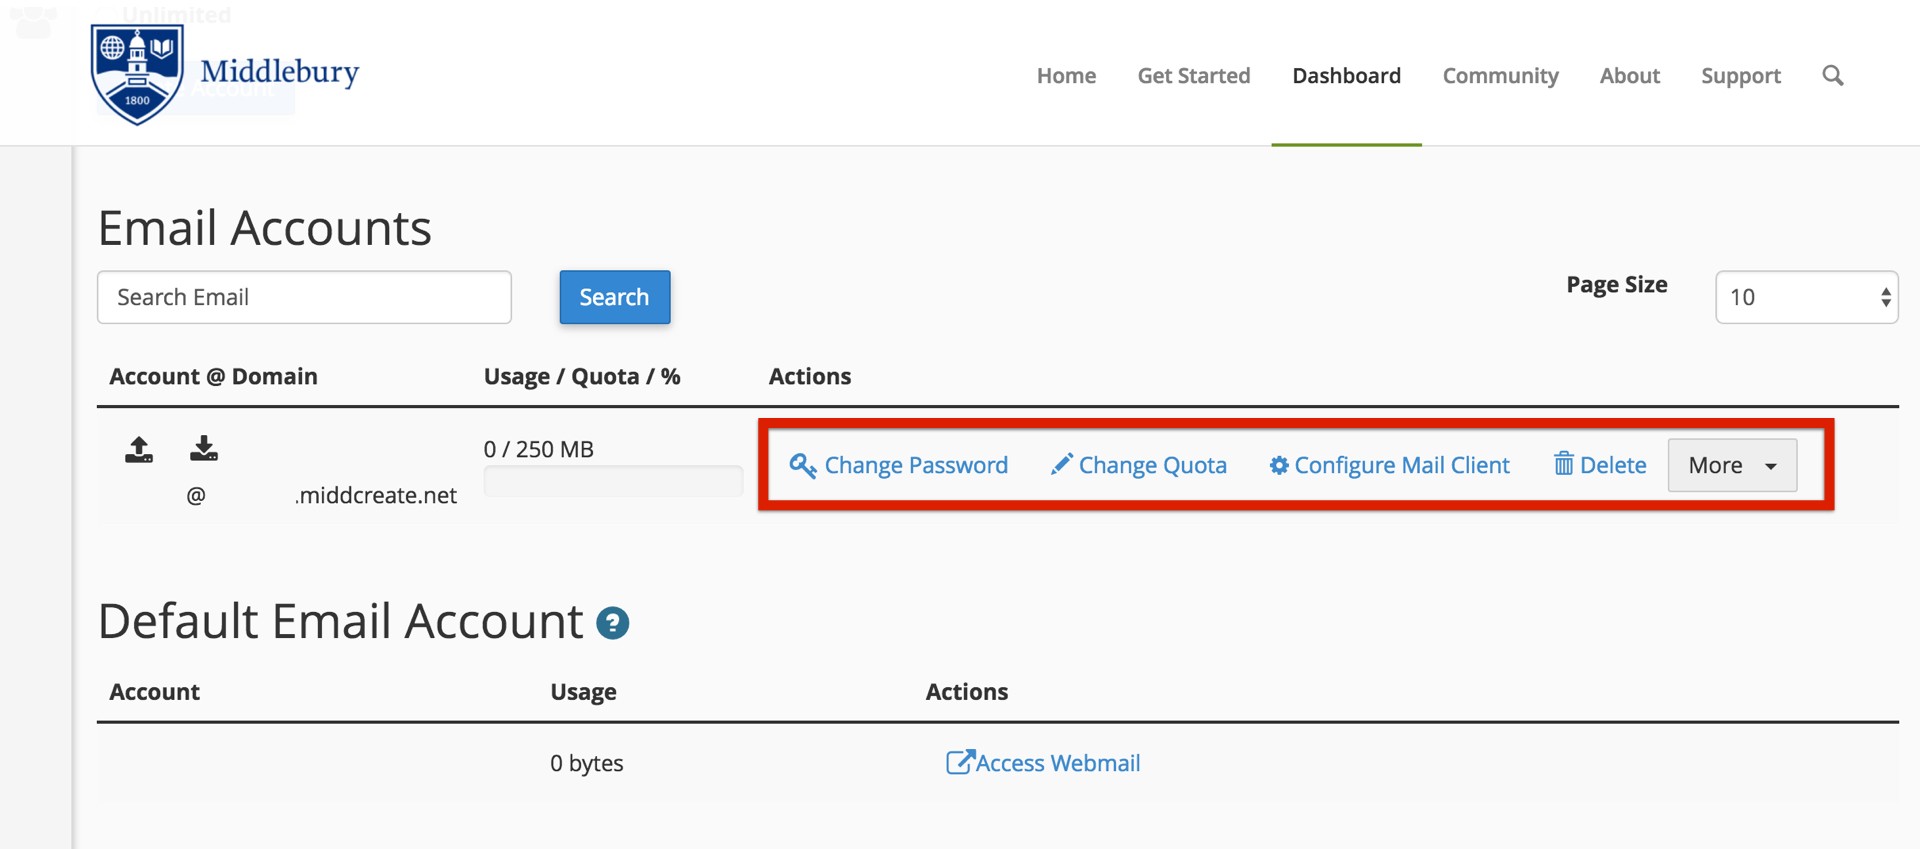
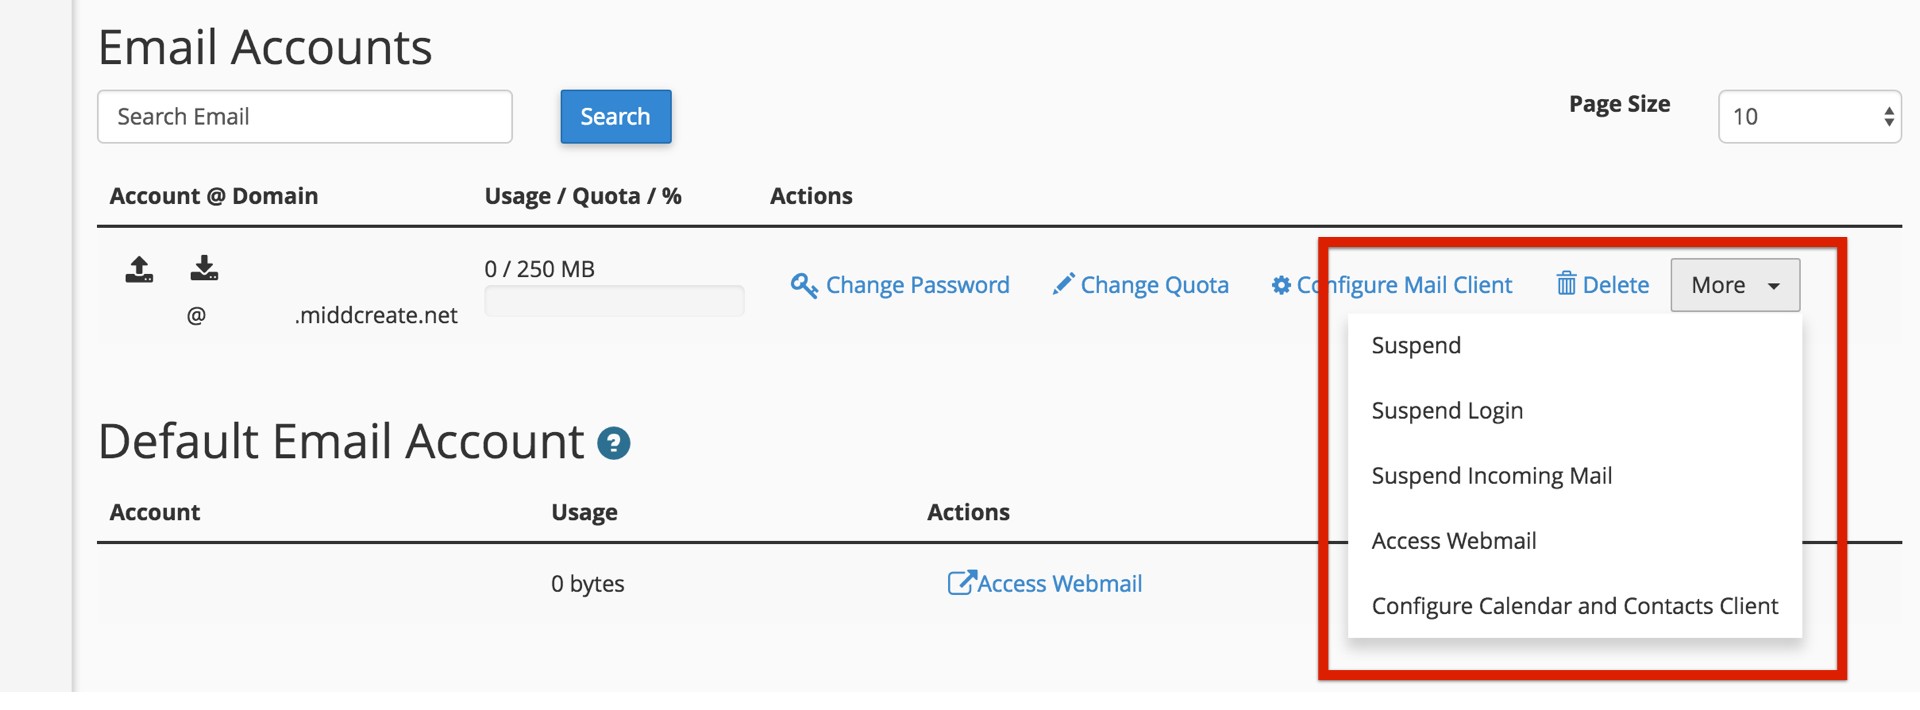
Your email address is created and it’s ready to be used. You have the choice of accessing it via the webmail options built into your control panel, or setting up a mail client directly from your desktop, laptop, or mobile device. To access these options you can click on the More button.email settings.001

email settings more.001

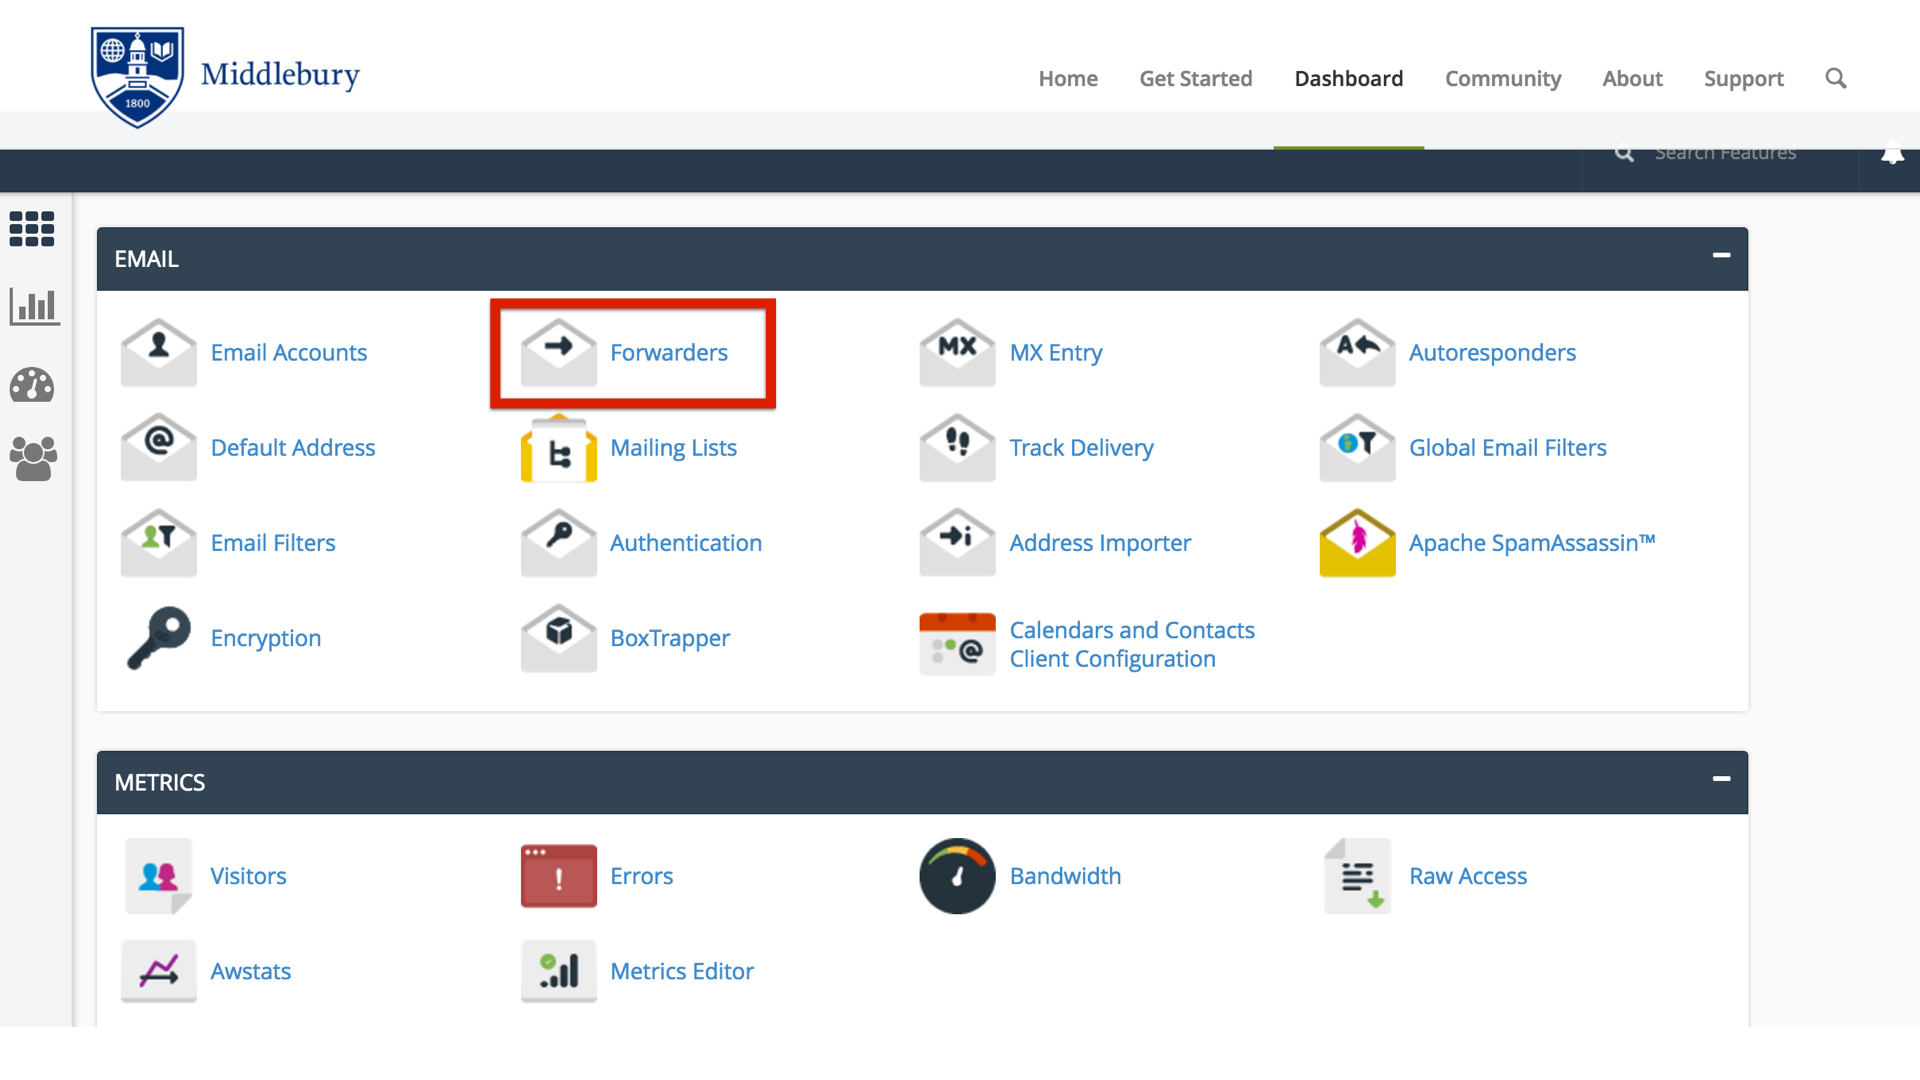
If you already have an email address you want to use like a Gmail or Hotmail account, you may wish to create an Email Forwarder instead of a mailbox. Setting up a forwarder is very simple. Start by clicking on instead of a mailbox. Setting up a forwarder is very simple. Start by clicking on Forwarders from the Mail section of your control panel homepage.

forwarder.001

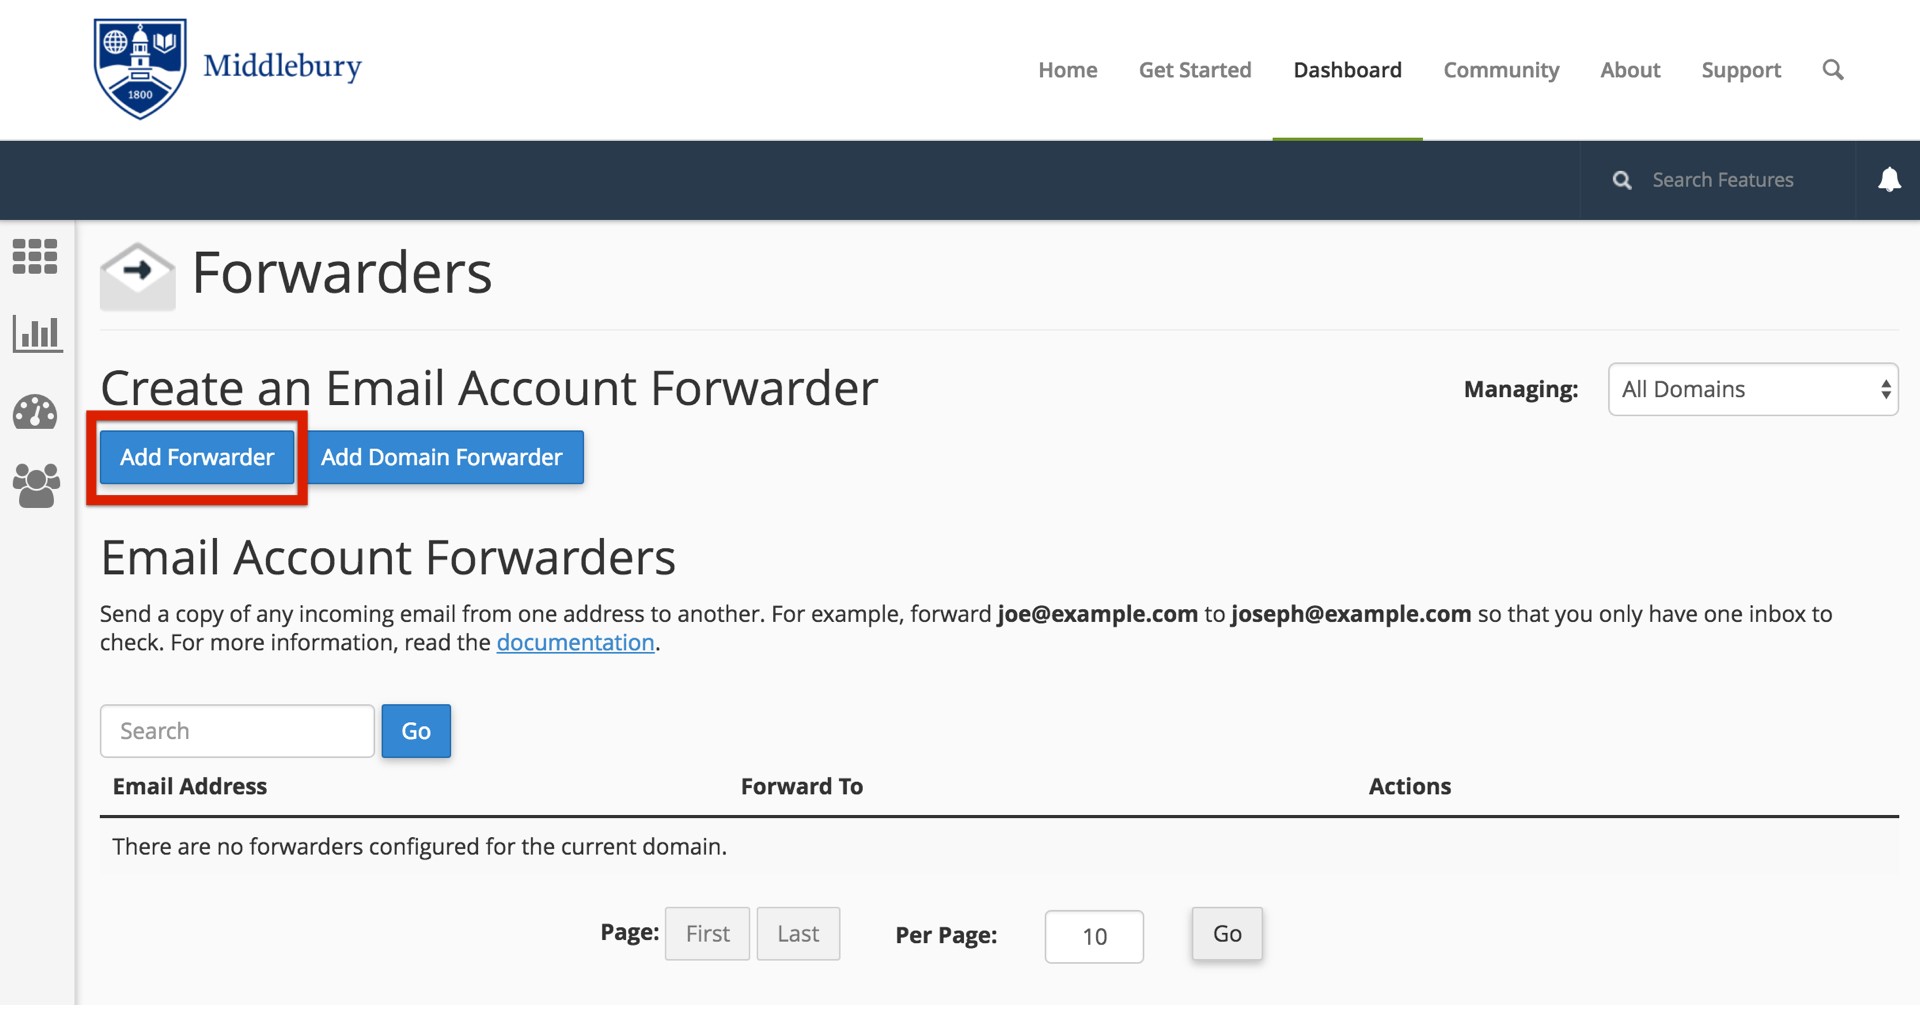
The first screen will show you any existing forwarders that you have created. To setup a new forwarding account, click Add Forwarder.

add forwarder.001

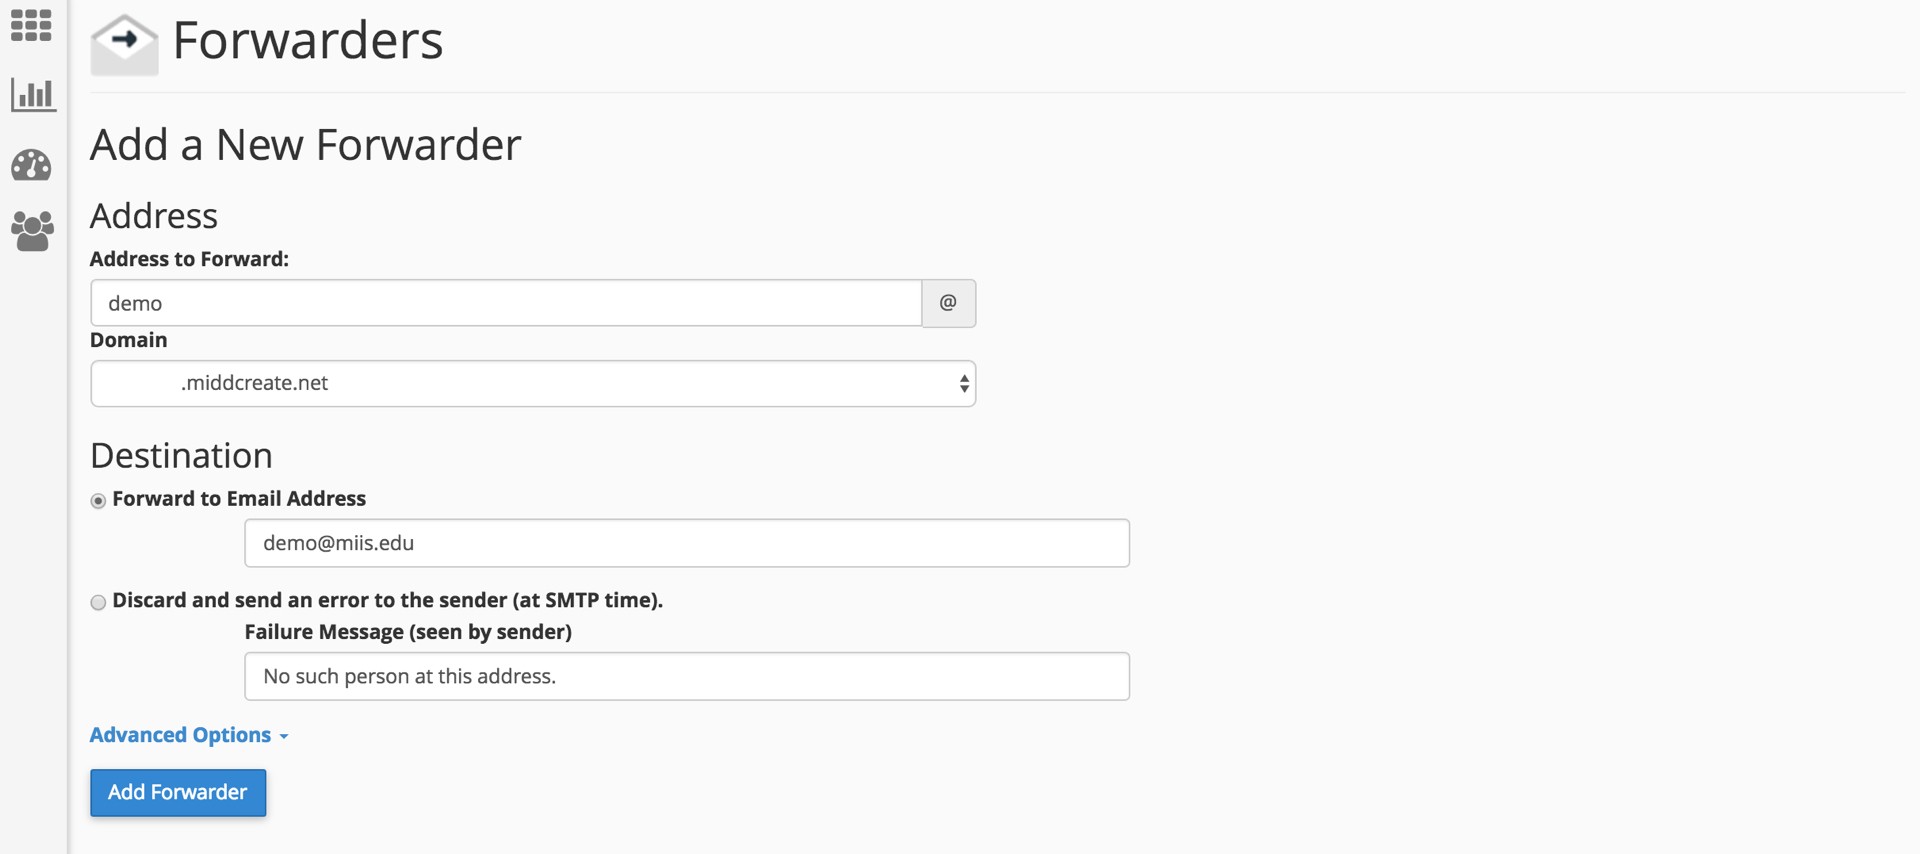
To create a new forwarding account, simply type in the desired email address as well as the email address you’d like all mail to be forwarded to. When you are done click Add Forwarder.forwarding address.001

You have now successfully created an Email Forwarder and all email sent to your custom email address will be forwarded on to the address you entered.

Video Tutorials

Create a Self-Hosted Email Account:


Access your Self-Hosted Email Account:

File Structures and the File Manager

Web hosting is, at it’s basic core, files and folders on a computer that is connected to the internet and setup to distribute them. How that computer (typically a server) is setup to do that is covered more in LAMP Environments but this article will explain the idea of the file structure and how it relates to what you view on your domain.

When you signed up for your domain a web hosting account was created. Although you typically will interact mostly with the web interface to create subdomains, install applications, and other common tasks, you might occasionally also need to work directly with the files in your account. The File Manager in your cPanel is one way to see these files. You can also create an FTP account in cPanel and use an FTP program to interact with these files (FTP stands for File Transfer Protocol, and it’s a way of using a desktop client to transfer files to and from your Web server space).

Let’s take a look at the File Manager built into your cPanel to get a better understanding of the file structure that makes up your website(s).

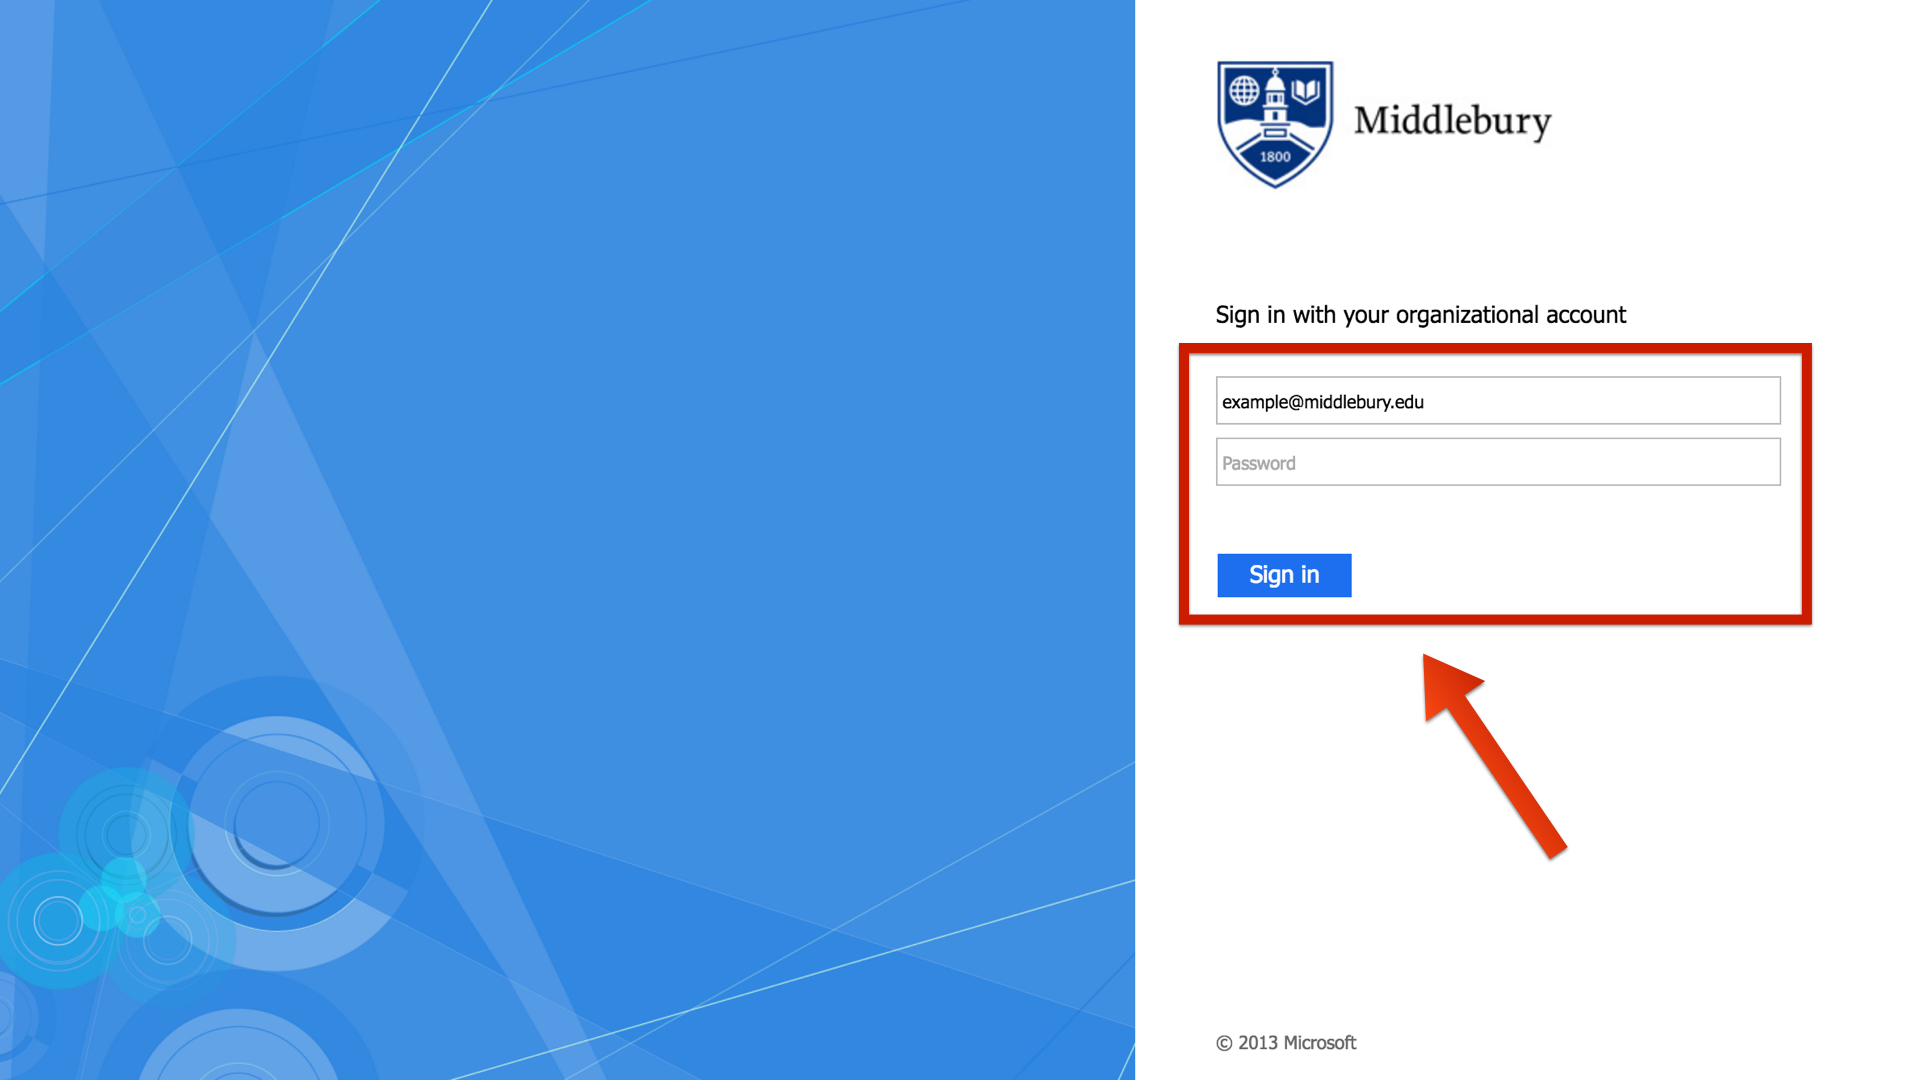
  • Login to cPanel with your Skidmore username and password.sign in.001


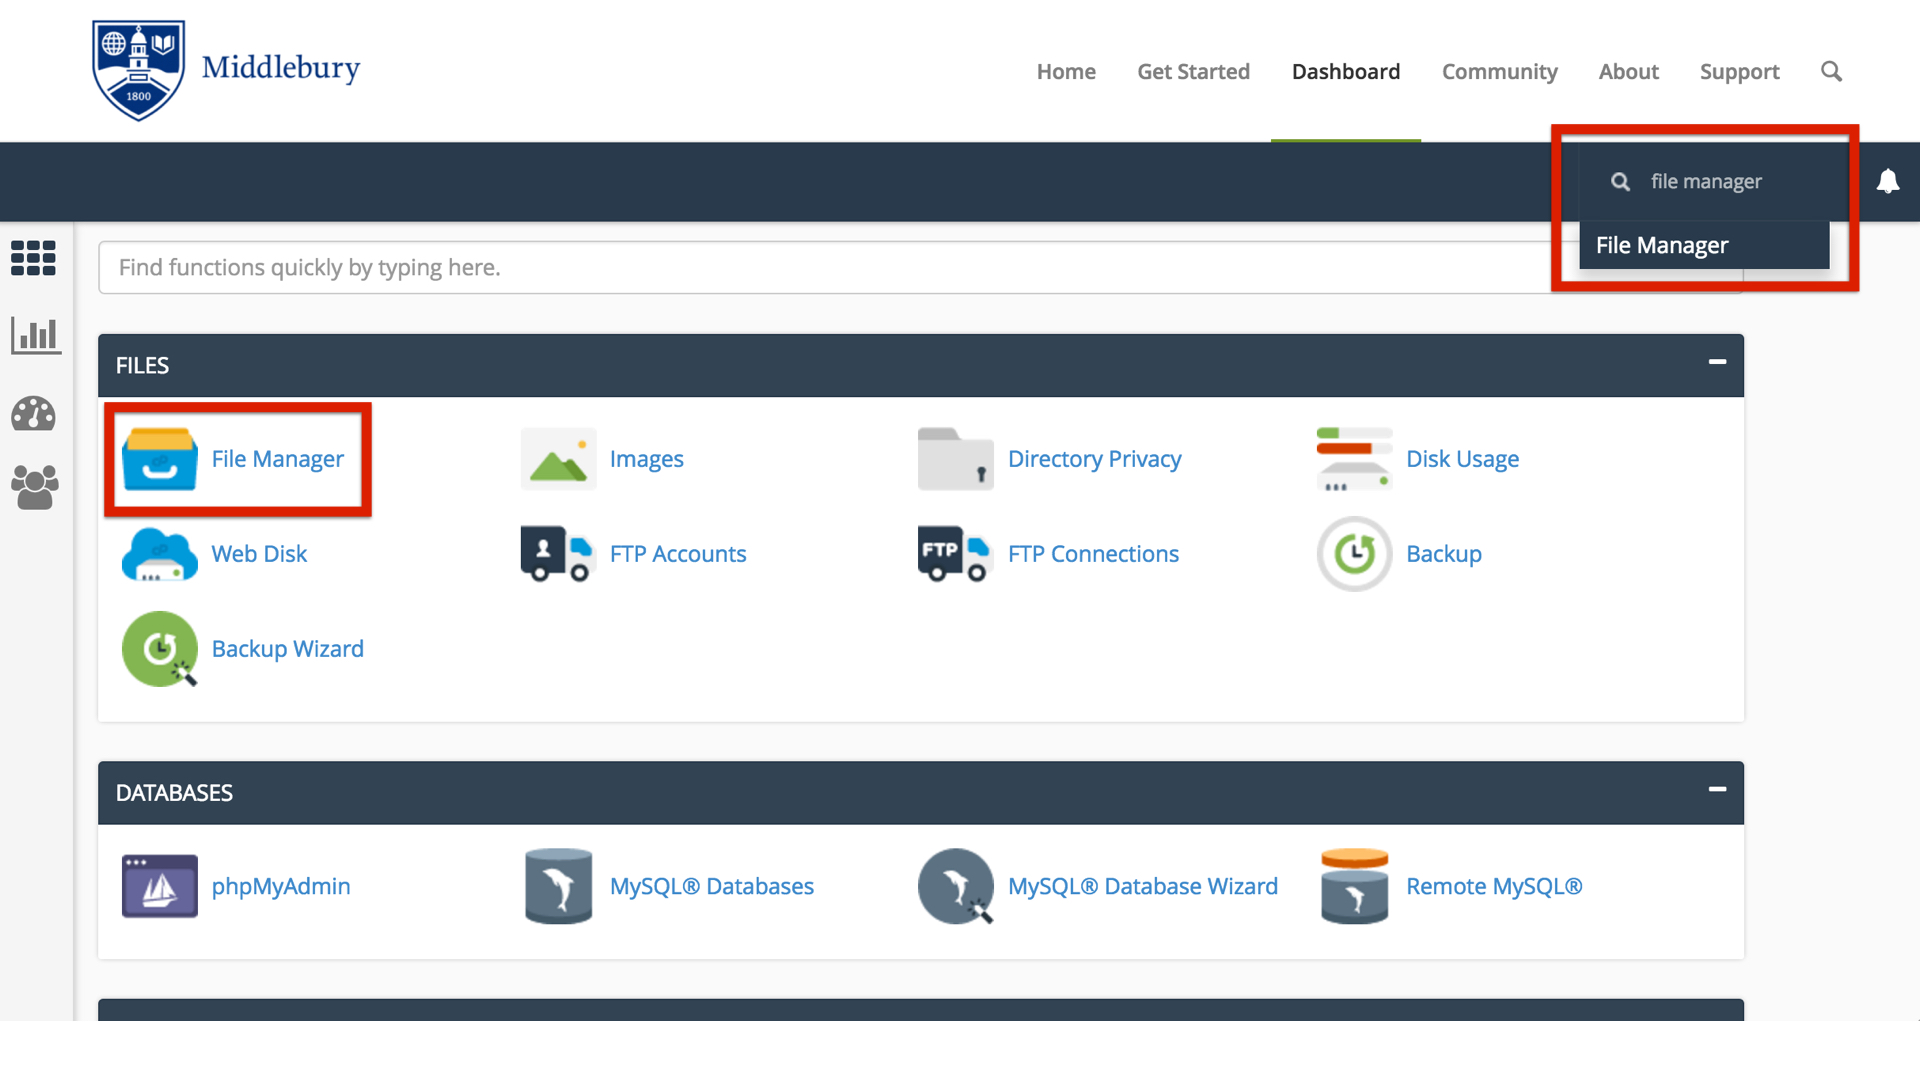
  • On the homepage of your control panel you’ll have all the various tools listed. You can easily find the File Manager by using the search tool in the upper righthand corner and typing File Manager. You can also find its icon under Files.file manager search.001


  • You are now sent to the File Manager and can navigate the folder structure there.

You’ll notice when the File Manager opens up that this looks very much like a folder on your computer. There are a few folders in it as well as files, and you can navigate down into those folders and see what’s inside of them. At the top level of the File Manager you also have the option of interacting with files and folders you select by moving them around or removing them. There is a larger article all about how to use the file manager at Accessing Your Files through the File Manager so we won’t talk much about how the interface works, rather we’ll cover what those folders and files actually mean and how they relate to what someone sees when they visit your website.

By default you have a variety of folders at the root of your web space (the first screen you see when you open up the file manager). Some of them are created automatically to store information about the panel and setup of certain sites. These folders are things like access-logs, etc, ssl, and tmp. You can safely ignore most of those folders because they don’t correspond to actual websites. Let’s look at which folders do and how it all works.

Your main domain, mydomain.com, corresponds with a folder called “public_html.” Whatever files and folders are inside of this folder are available at that domain. If you installed WordPress here you’ll likely see a lot of WordPress-related files within it (which were probably helpfully put there by the automated installer). Let’s say we uploaded an image called mypicture.jpg into the public_html folder. That image would now be available at mydomain.com/mypicture.jpg. The slash after your domain implies “this file is inside this folder”. But what if we had a folder inside the public_html folder? How does that appear? This is typically called a subfolder so let’s put a folder in public_html called “images” and put our image, mypicture.jpg, inside of that folder. What would you type in a browser to get to that file now? The location would be mydomain.com/images/mypicture.jpg. So subfolders are also indicated by a forward slash after a domain.

What about subdomains? You can have completely separate sites called subdomains that appear as nameofsubdomain.mydomain.com. But where are they in the file structure? When you created your subdomain the control panel asked you to give the folder a name. If I had a subdomain called photos.mydomain.com for example, I might want to name the folder “photos” (by default your control panel will call the folder by the name of the subdomain). Folders for subdomains are located inside the public_html folder. So when you go to the File Manager and navigate to public_html you’ll see folders listed for all of your subdomains and once you navigate inside one of those folders you’ll see files and folders specifically for that subdomain that appear on the web at that subdomain’s address.

The File Manager in your control panel is great to view these files and folders, but it can be limiting if you want to upload an entire folder of information to your website. If you find yourself wanting to do more with the files and folders on your web space you can download an FTP program like Filezilla and connect to your website by creating an FTP account in your control panel (also located in the Websites and Domains tab). An FTP program will allow you to upload and download an unlimited number of files and folders quickly.

Known

Known is a social publishing platform that combines aspects of blogging and social media. It’s very easy to use and works like a Facebook group or Tumblr.  You can invite up to 200 users to collaborate by sharing posts, status updates, photos, and audio.  You can also make your own events or RSVP to external events. Known integrates with a number of social networks. When you publish on Known, you can choose to syndicate your content to a variety of sites like Facebook, Twitter, LinkedIn, Flickr, Soundcloud, and more. It also has the following features:

  • Use hashtags with any content to categorize and organize what you publish
  • Privacy settings that let you make posts or the whole site public, private, or for members only
  • View, edit, and post from any device (tablets, smartphones, etc.)
  • Import posts from a WordPress site

1. To get started you’ll need to log in to your control panel (https://domains.skidmore.edu/dashboard) using your Skidmore username and password.

sign in.001

2. Once logged in you’ll be at the homepage of your control panel. Navigate to the Installatron by looking under the ‘Software’ section or typing “Installatron” into the search bar at the upper right corner of the page.

installatron new.001

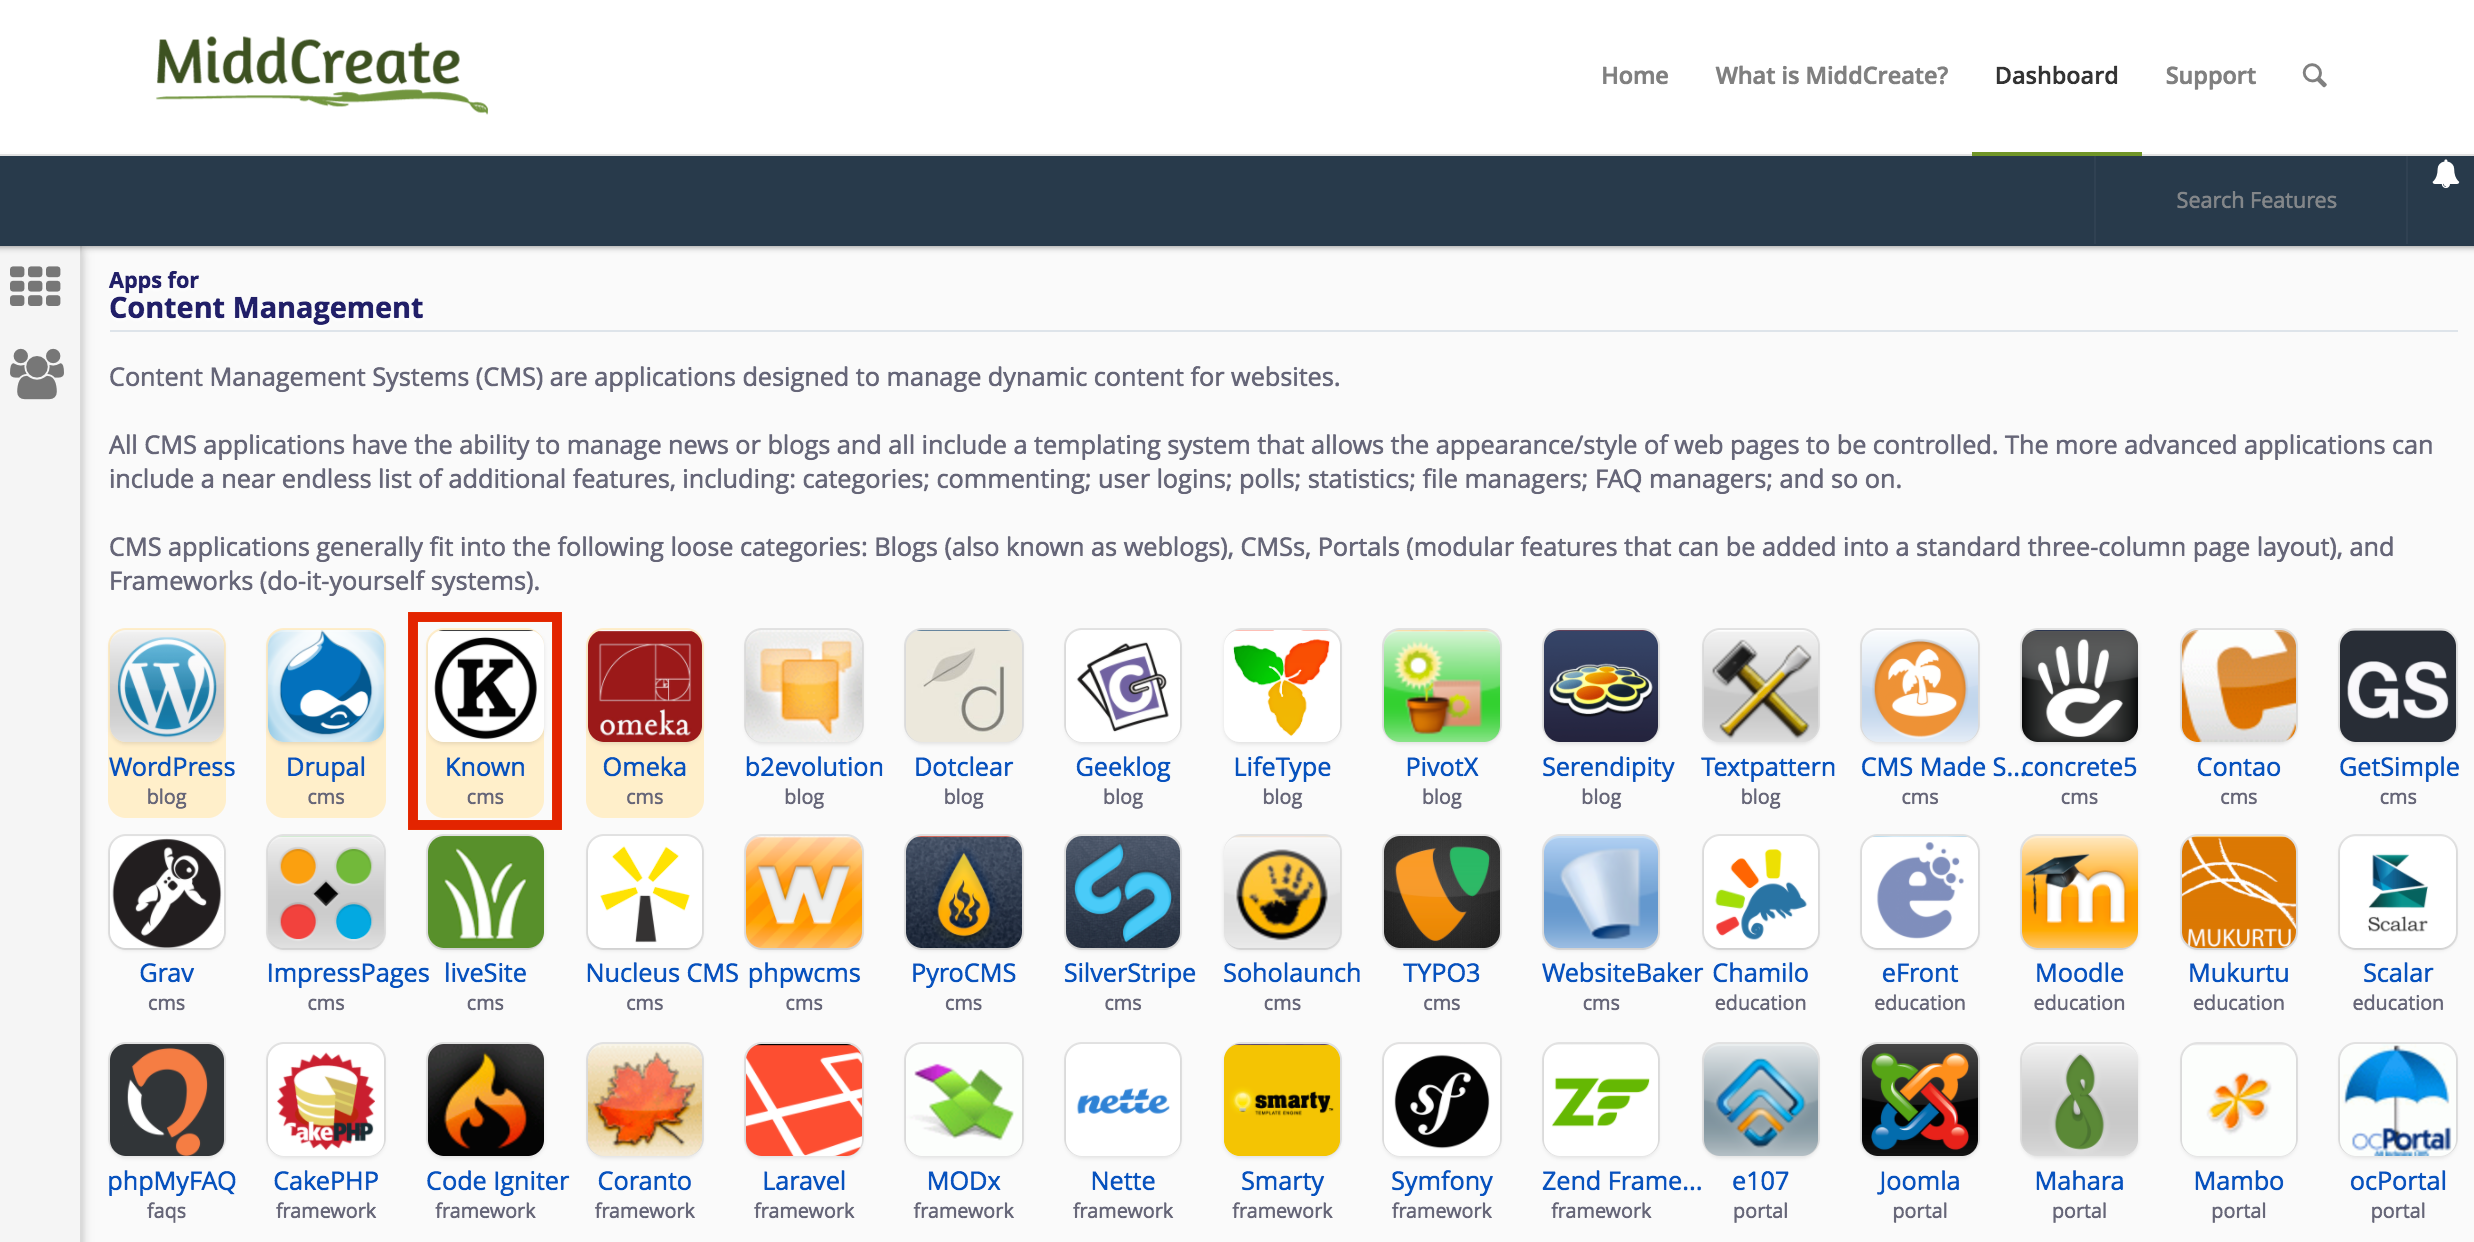
3. Click on the Applications Browser tab (the one with the star). Then select Known under the ‘Apps for Content Management’ section.

known

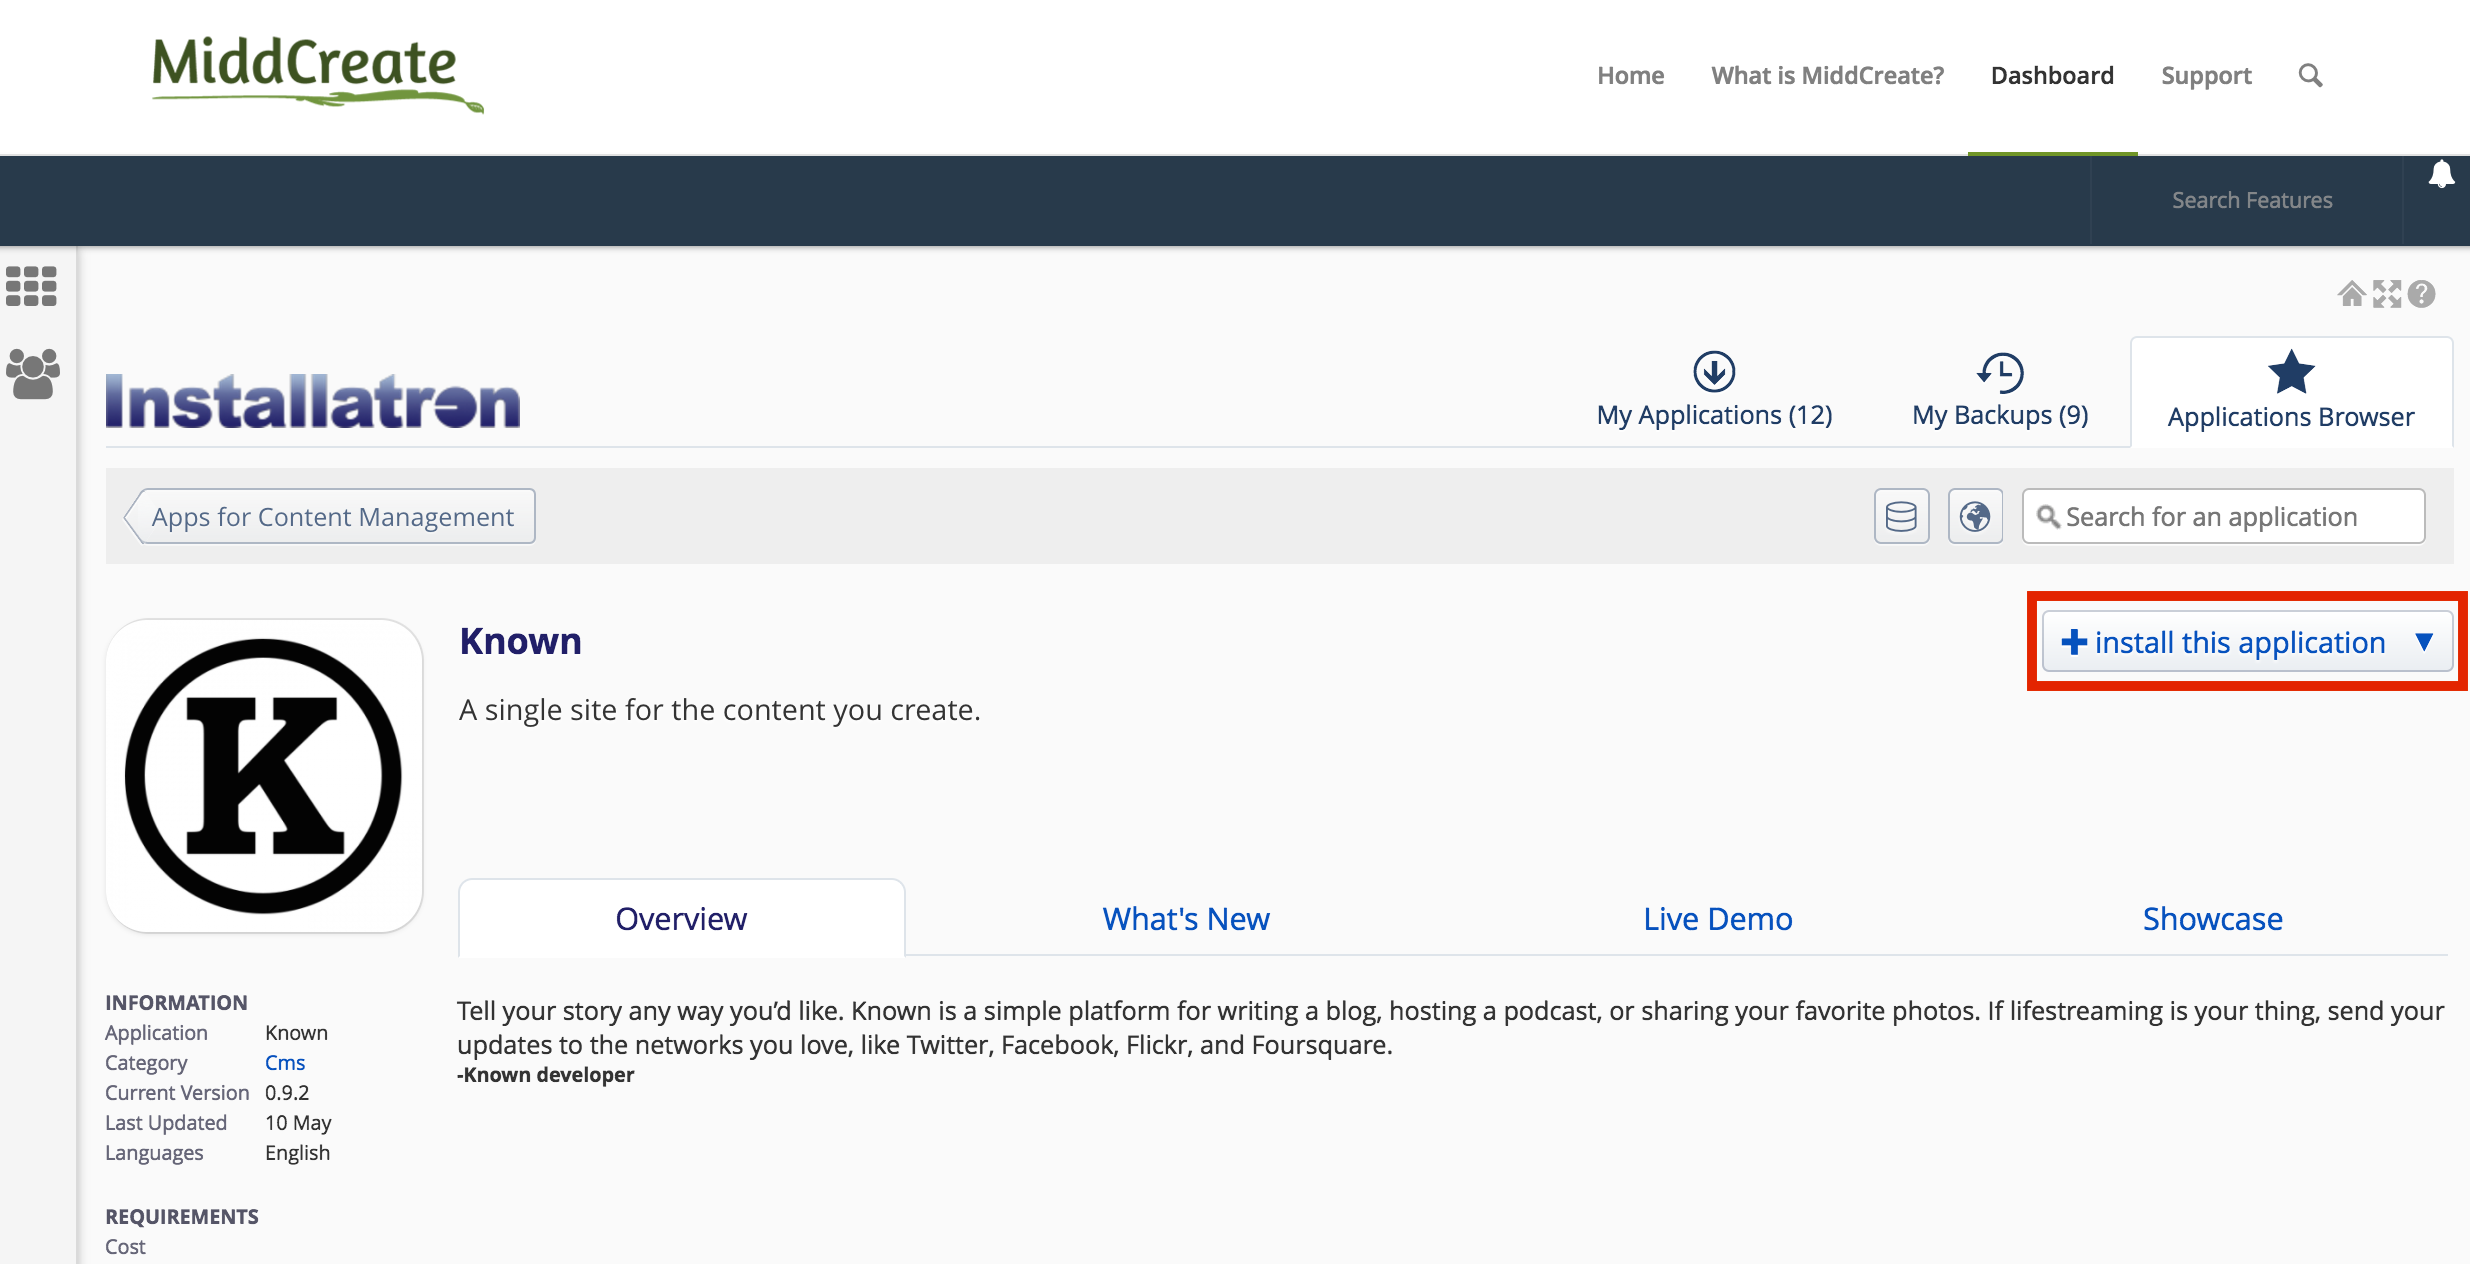
4. This page gives you more information about the Known software. In order to connect Known to your social media accounts, you will need to install it on a subdomain. Before you proceed with this installation, first create a new subdomain. Once you have set up the subdomain, you can install Known by clicking ‘install this application’ in the upper right-hand corner.

known2

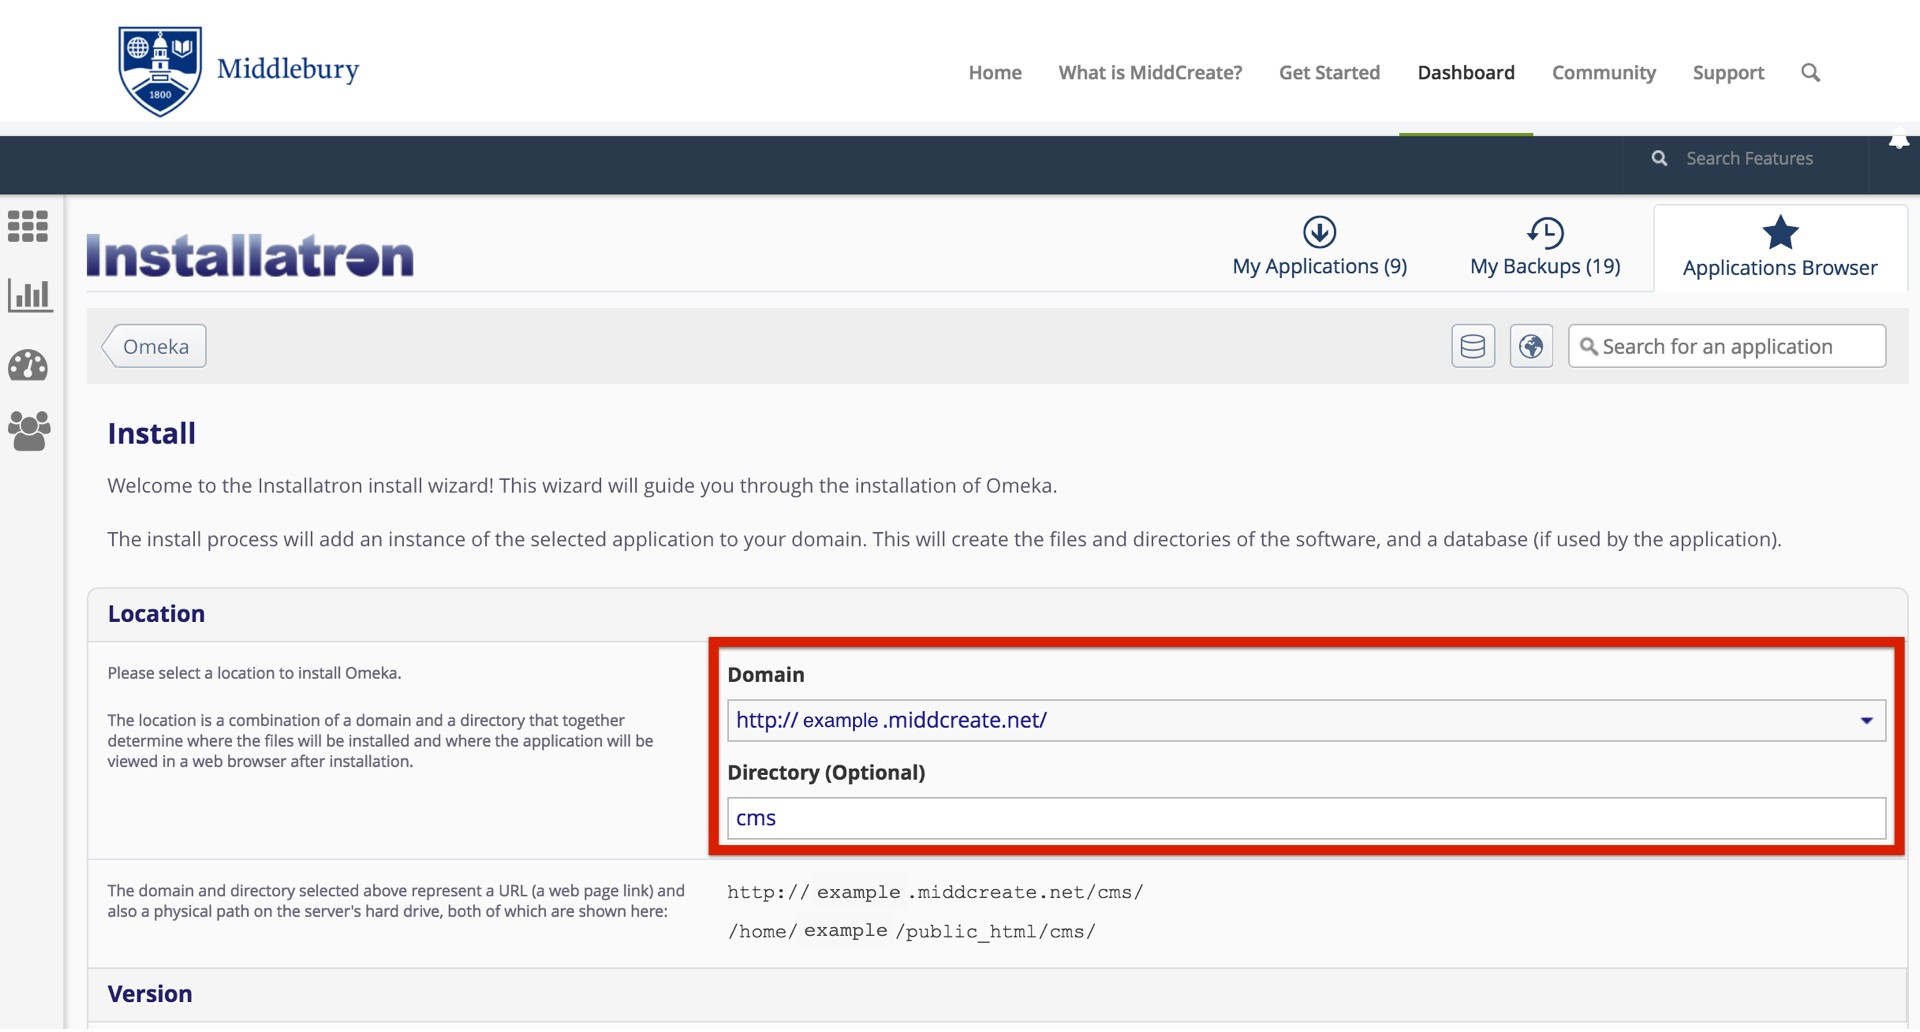
5. On the next page the installer will ask for some information about this install. Select the subdomain you created from the dropdown menu. You also have the option of installing Known in a subfolder by typing in the folder name in the Directory field. Click here for more information about subdomains and subfolders.

install omeka.001

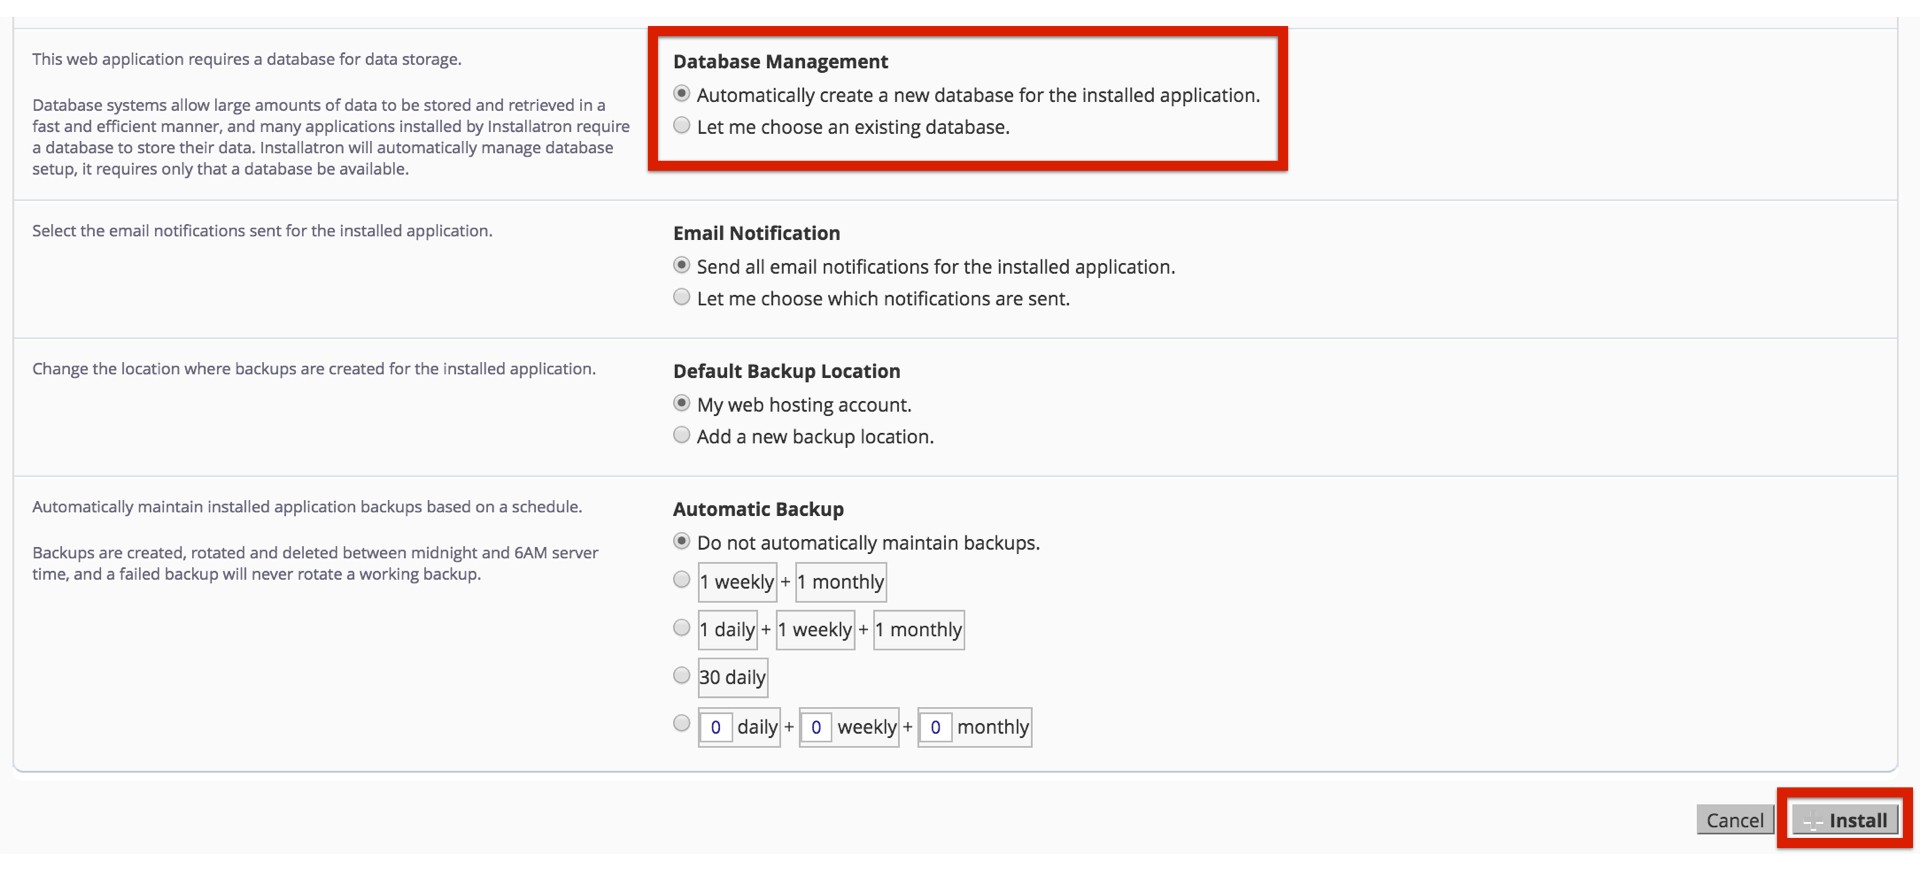
6. By default the installer will automatically backup your website and update it anytime a new version comes out. While we recommend you keep this option, it is possible to only do minor updates, or turn them off completely. The installer will also create a database for you automatically, but if you’ve already created one for this website you can choose Let me manage the database settings and enter the details. Click Install to continue. omeka database.001

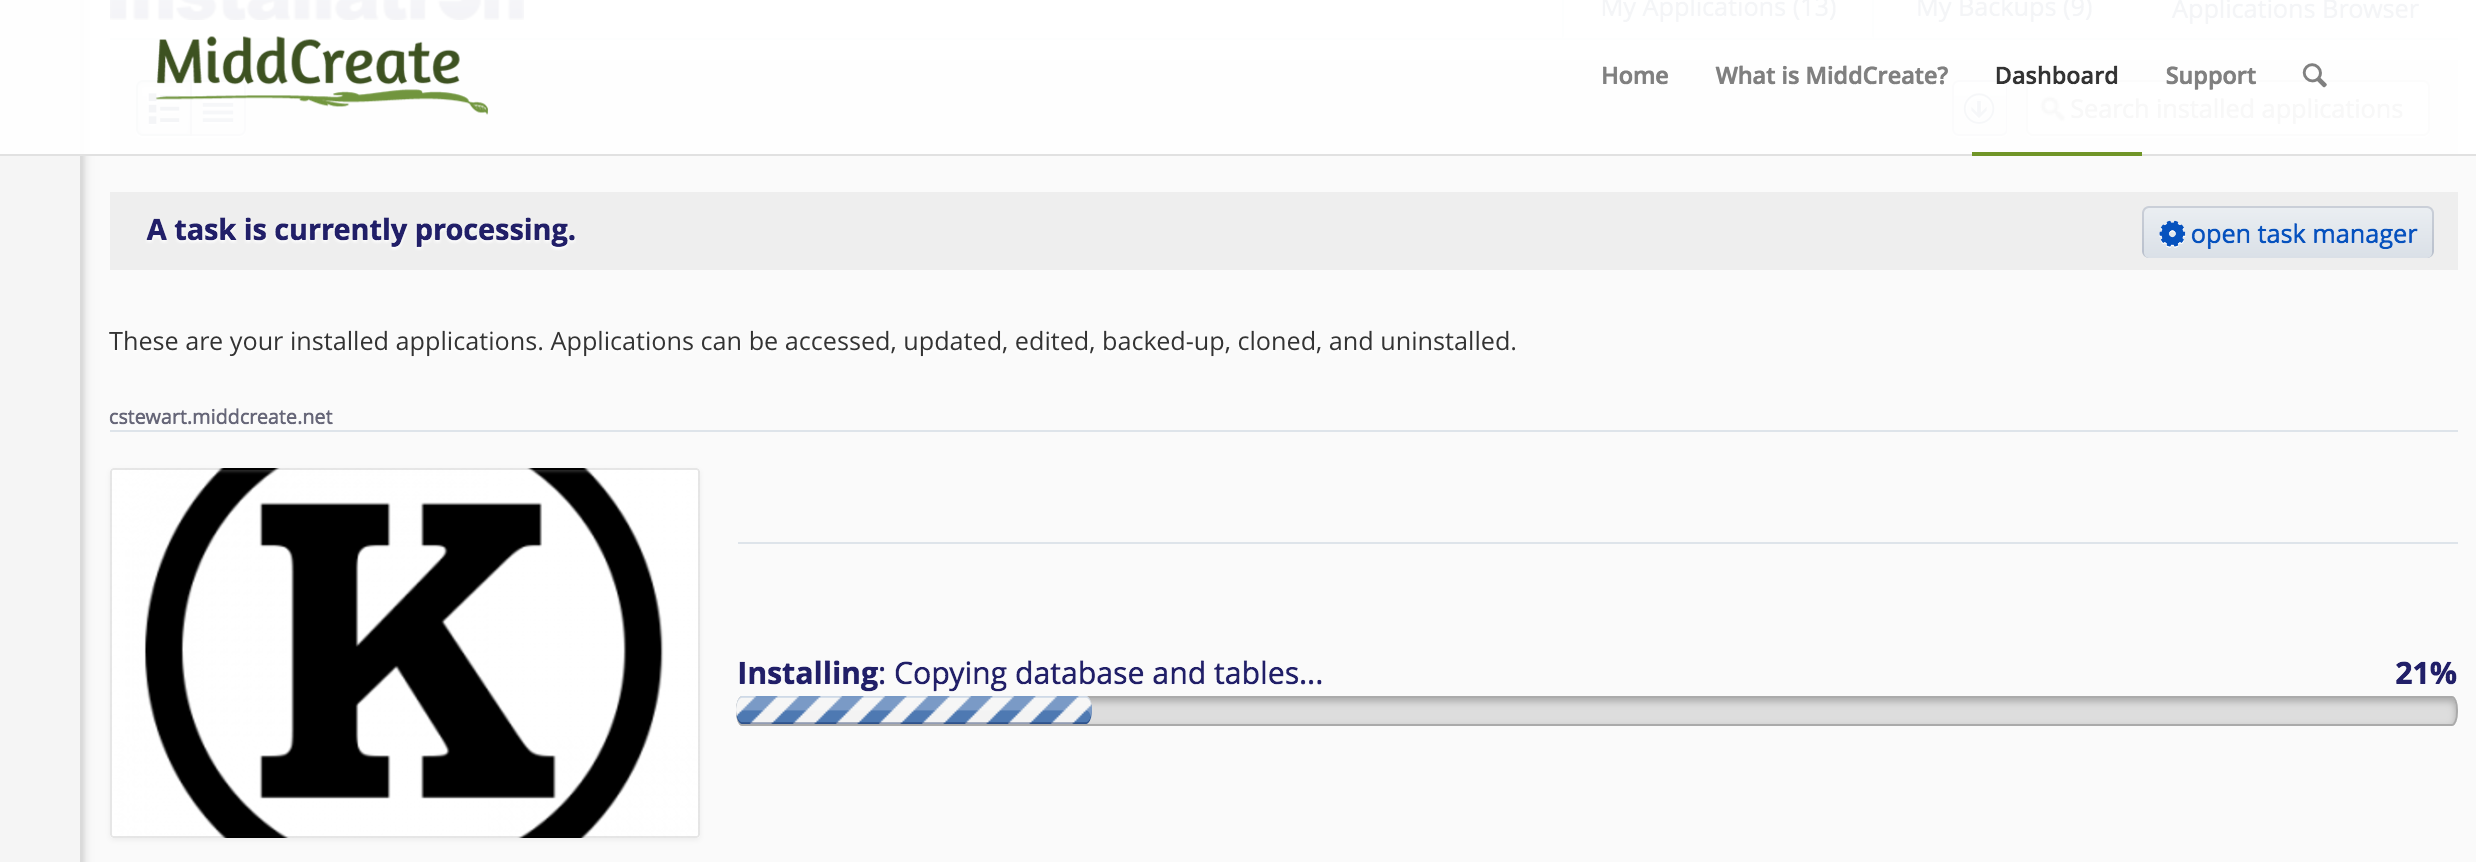
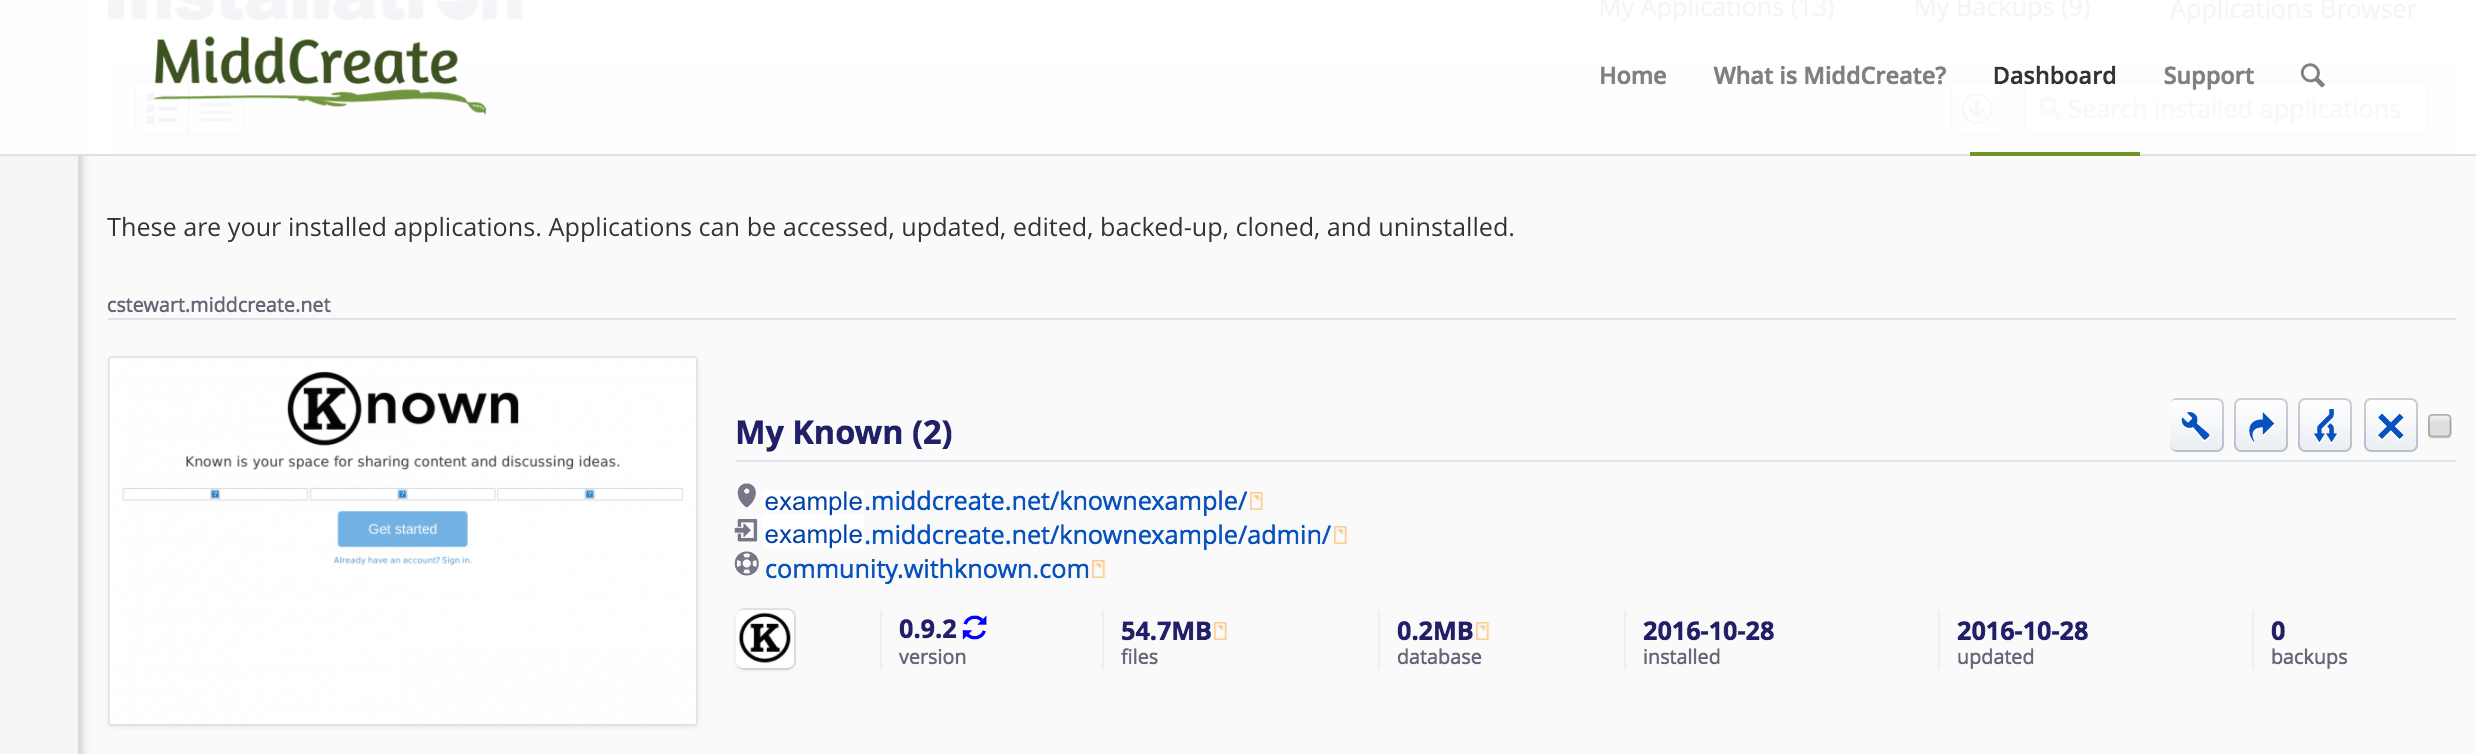
7. The installer will take just a few moments to install Known and a progress bar will keep you updated. When it is complete you will see a link to your new Known site as well as a link to the backend administrative section of the site.

knownprogress

knownlinks

8. Congratulations, you have now completed the installation of Known! Click the second link to log in to your Known site.

Using Known

You can learn how to use this application in the official Known Guides. These support guides will help you get started and begin posting content on your Known.

Scalar

Scalar is a free, open source authoring and publishing platform that’s designed to make it easy for authors to write long-form, born-digital scholarship online. Scalar enables users to assemble media from multiple sources and juxtapose them with their own writing in a variety of ways, with minimal technical expertise required. More fundamentally, Scalar is a semantic web authoring tool that brings a considered balance between standardization and structural flexibility to all kinds of material.

Scalar also features a built-in open API that allows you blend your Scalar content with other data sources, build your own visualizations, or create completely new interfaces for your materials. You can see some custom designed Scalar sites on this Skidmore Domains Apps Showcase site.

1. To get started you’ll need to log in to your control panel (https://domains.skidmore.edu/dashboard) using your Skidmore username and password.

sign in.001

2. Once logged in you’ll be at the homepage of your control panel. Navigate to the Installatron by looking under the ‘Software’ section or typing “Installatron” into the search bar at the upper right corner of the page.

installatron new.001

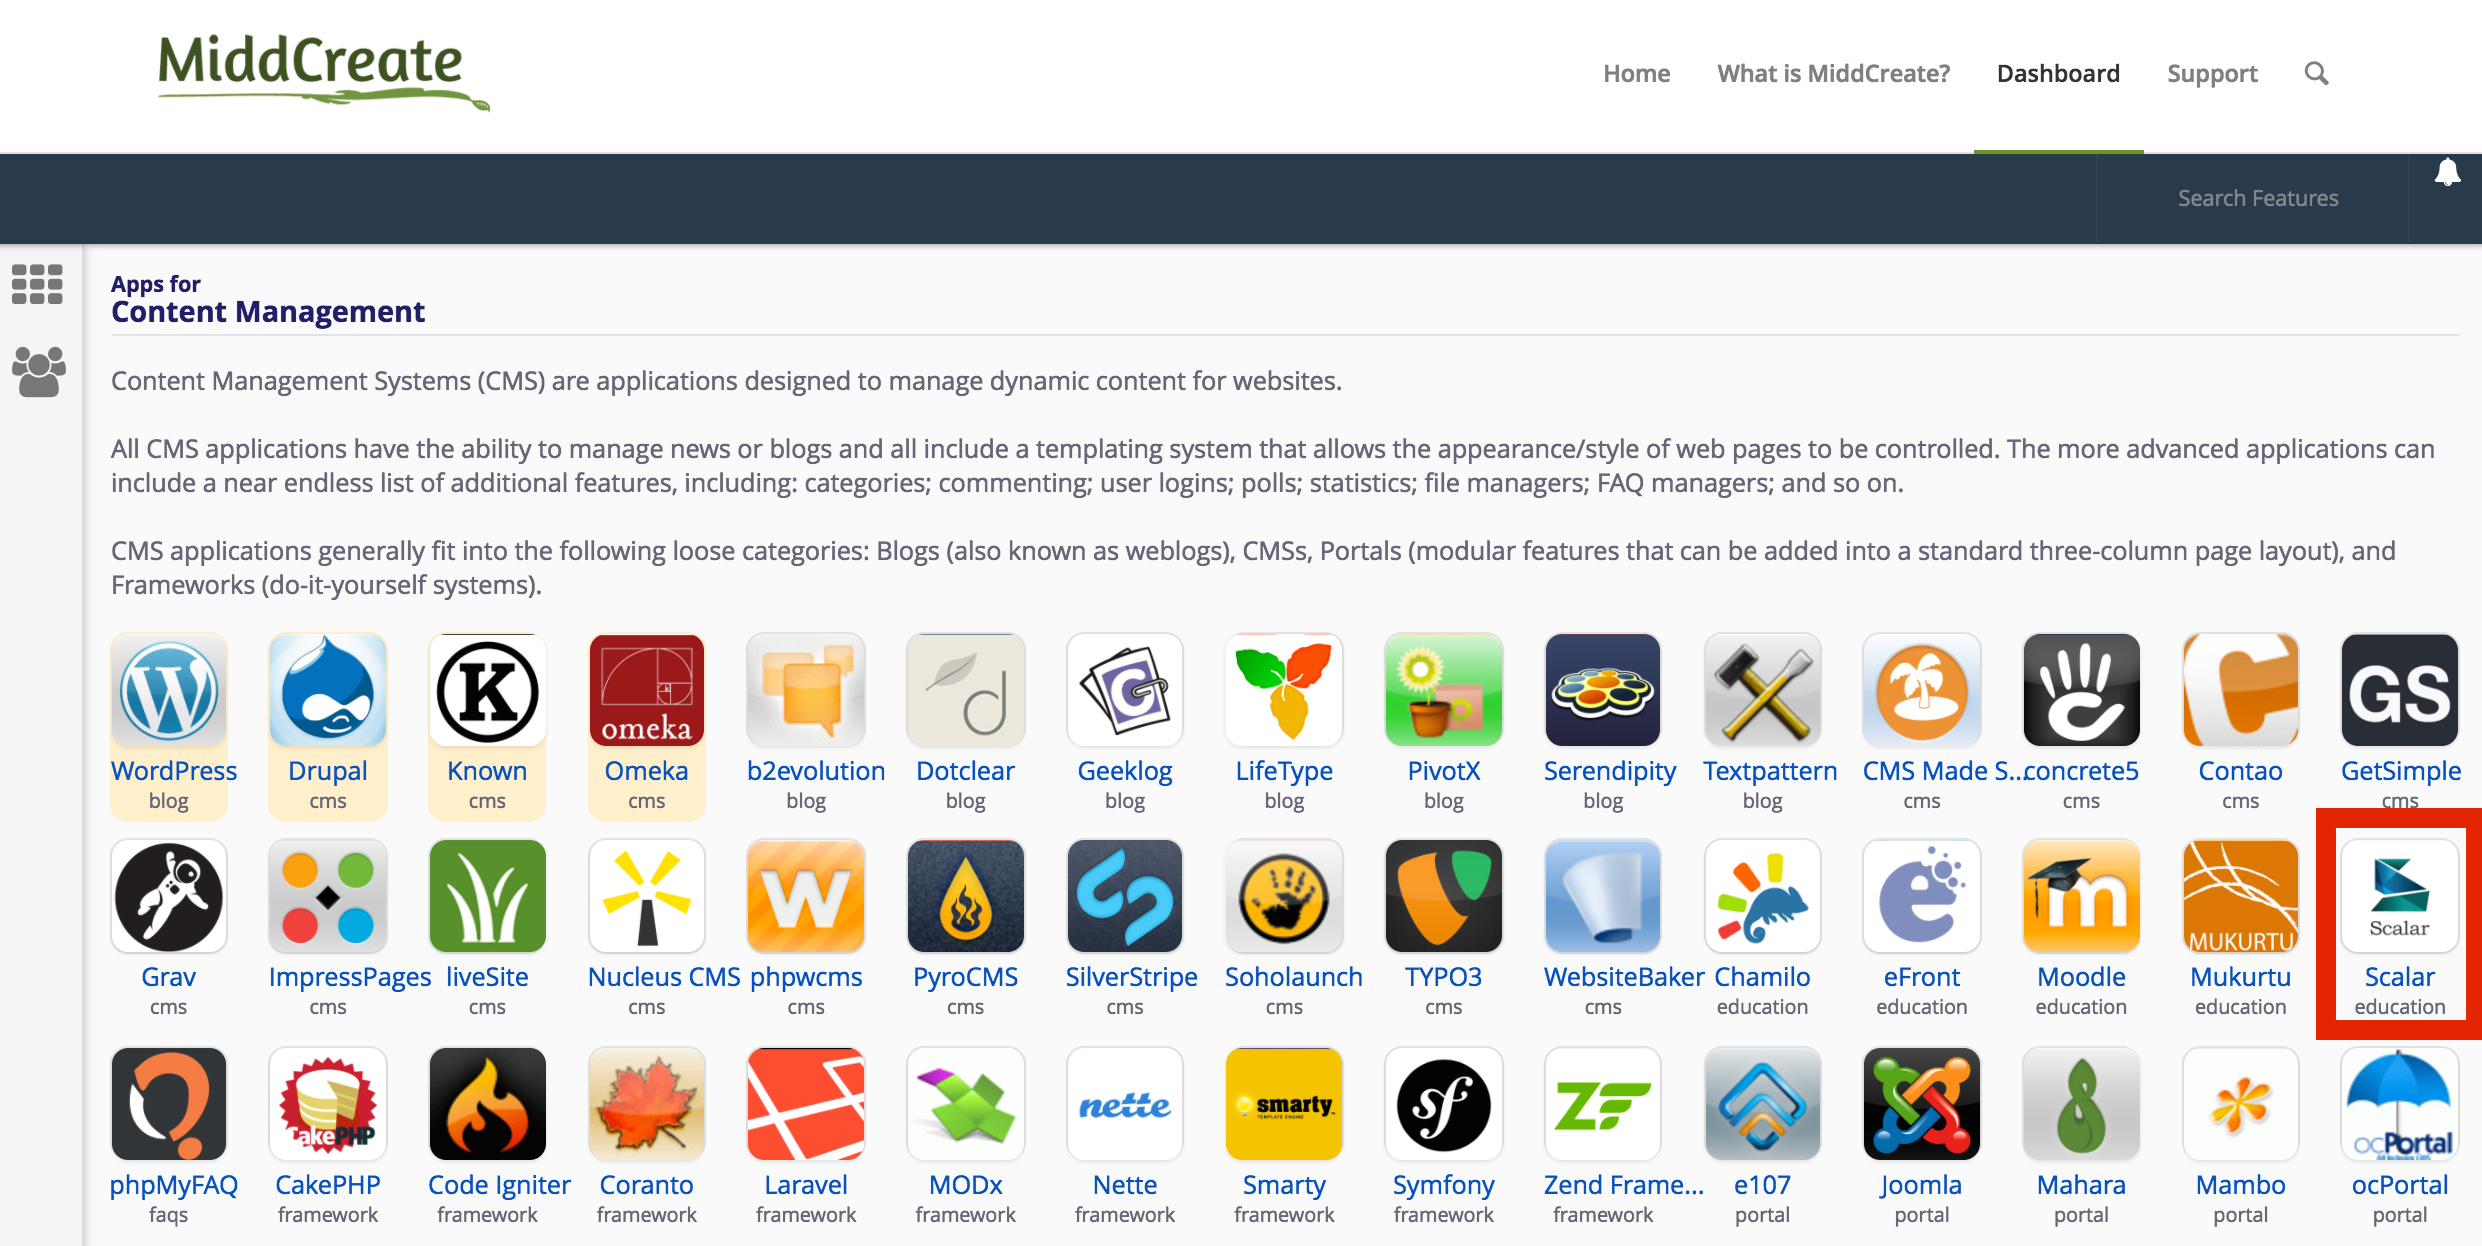
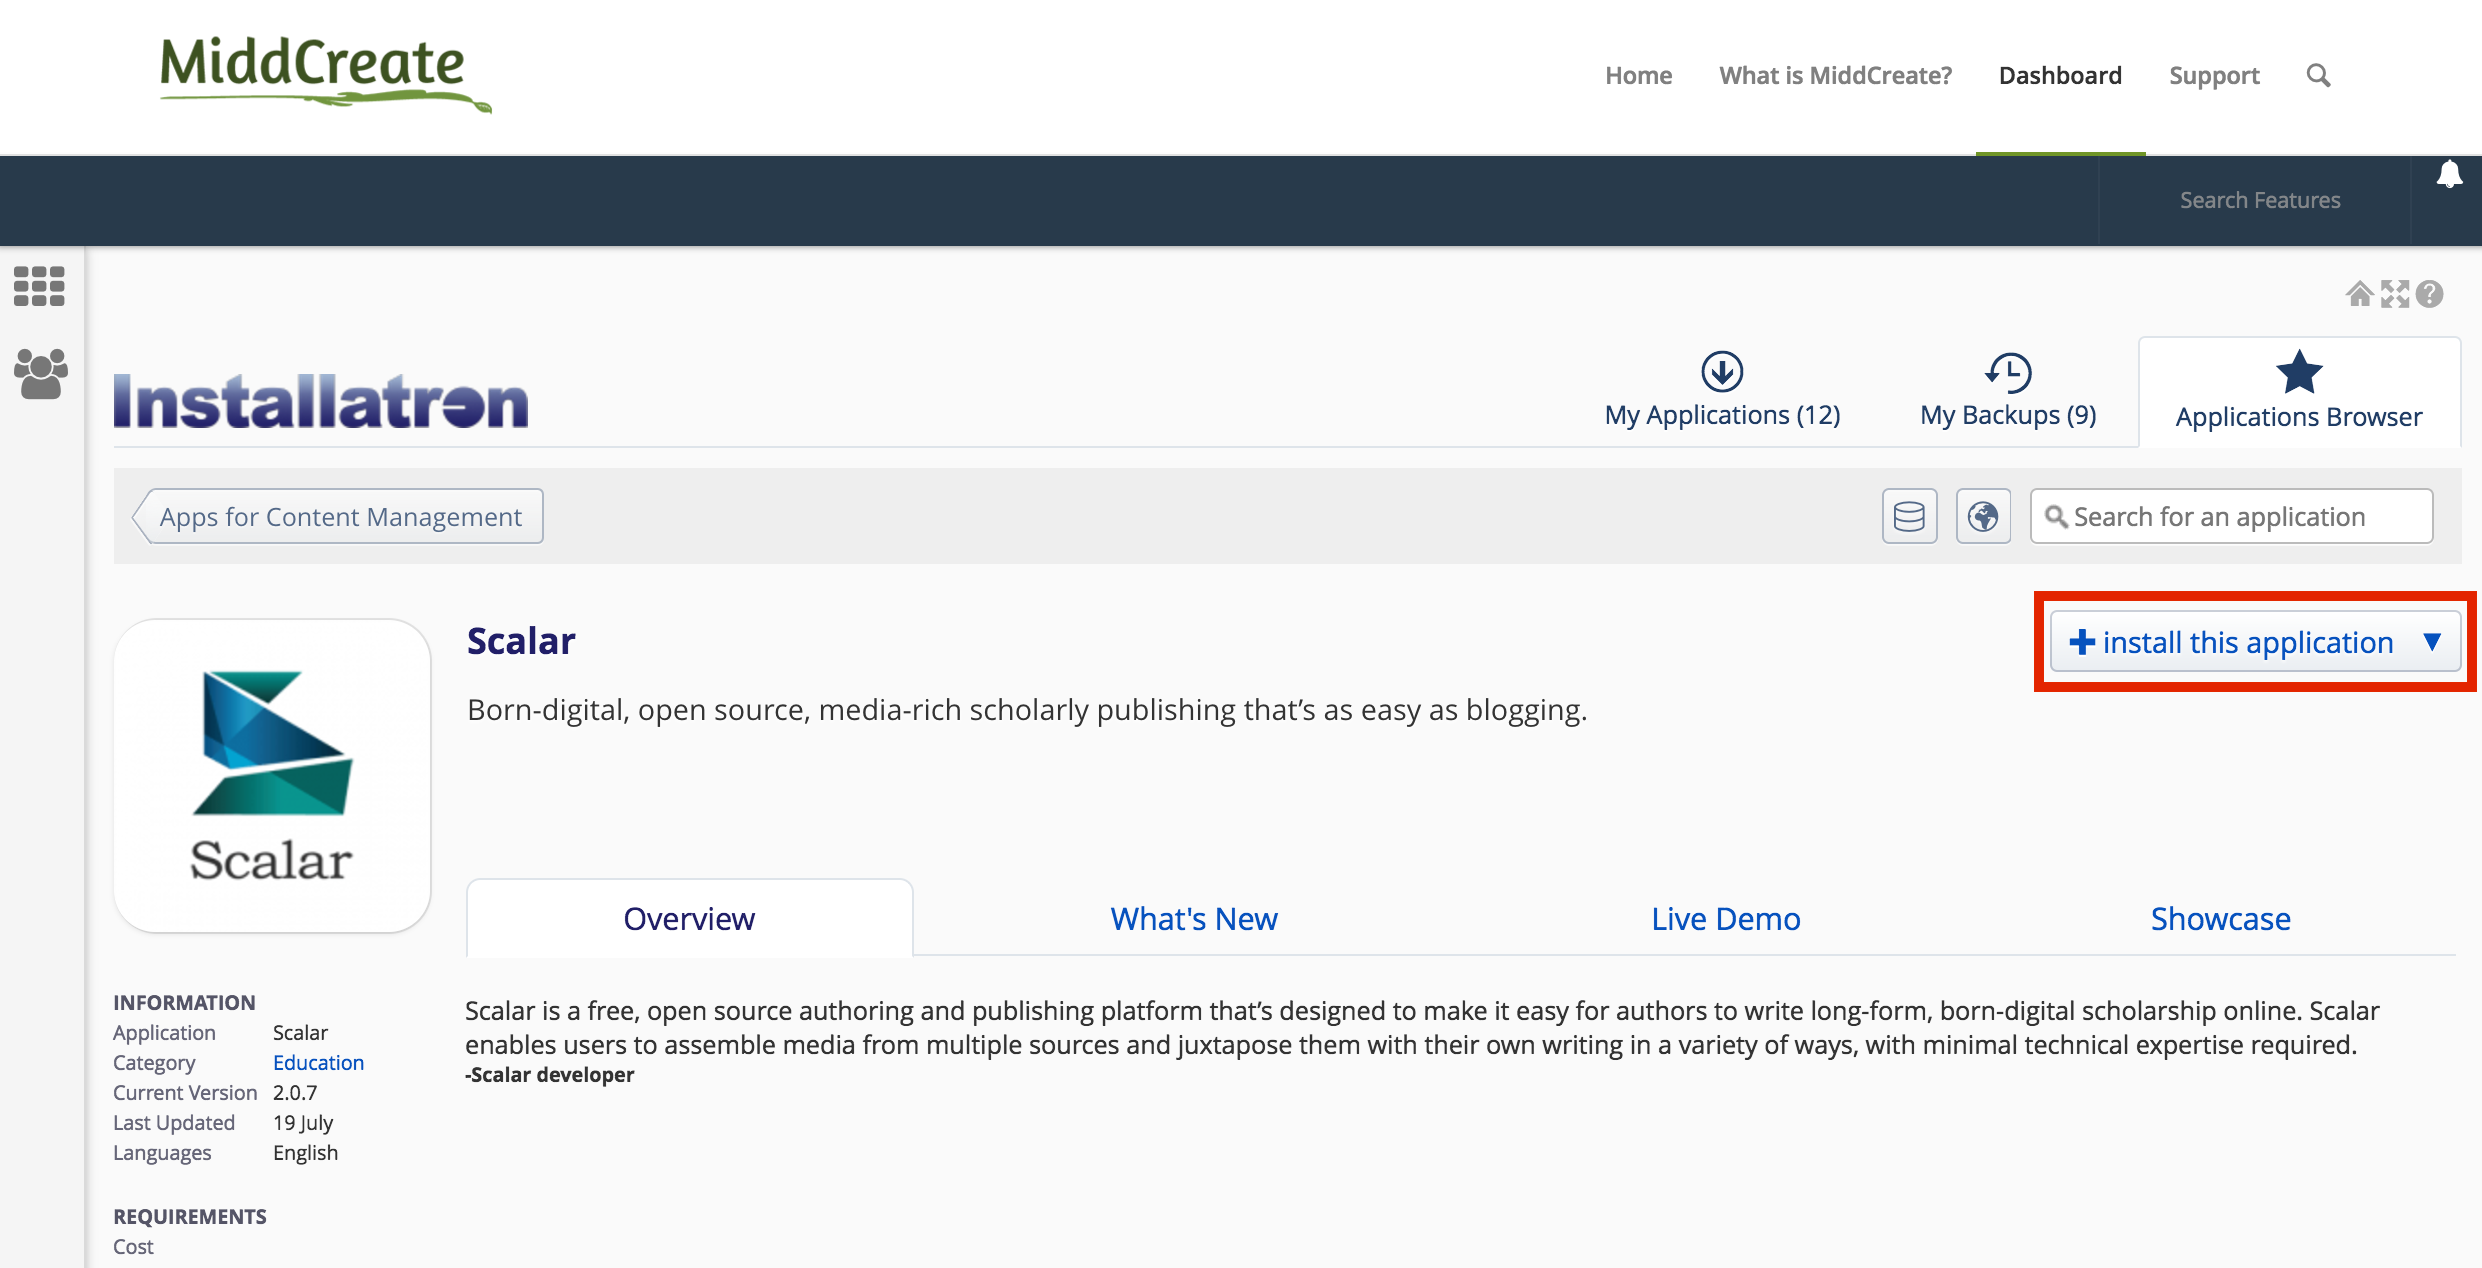
3. Click on the Applications Browser tab (the one with the star). Then select Scalar under the ‘Apps for Content Management’ section.

scalar

4. This page gives you more information about the Scalar software. To begin the install, click ‘install this application’ in the upper right-hand corner.

scalarinfo

5. On the next page the installer will ask for some information about this install. The first thing you’ll want to do is decide where to install it. If you’re wanting to install Scalar on your main domain, you can leave the directory area empty. If you created a subdomain, you can select it from the dropdown menu. You also have the option of installing Scalar in a subfolder by typing in the folder name in the Directory field. Click here for more information about subdomains and subfolders.

install omeka.001

6. By default the installer will automatically backup your website and update it anytime a new version comes out. While we recommend you keep this option, it is possible to only do minor updates, or turn them off completely. The installer will also create a database for you automatically, but if you’ve already created one for this website you can choose Let me manage the database settings and enter the details. Click Install to continue. omeka database.001

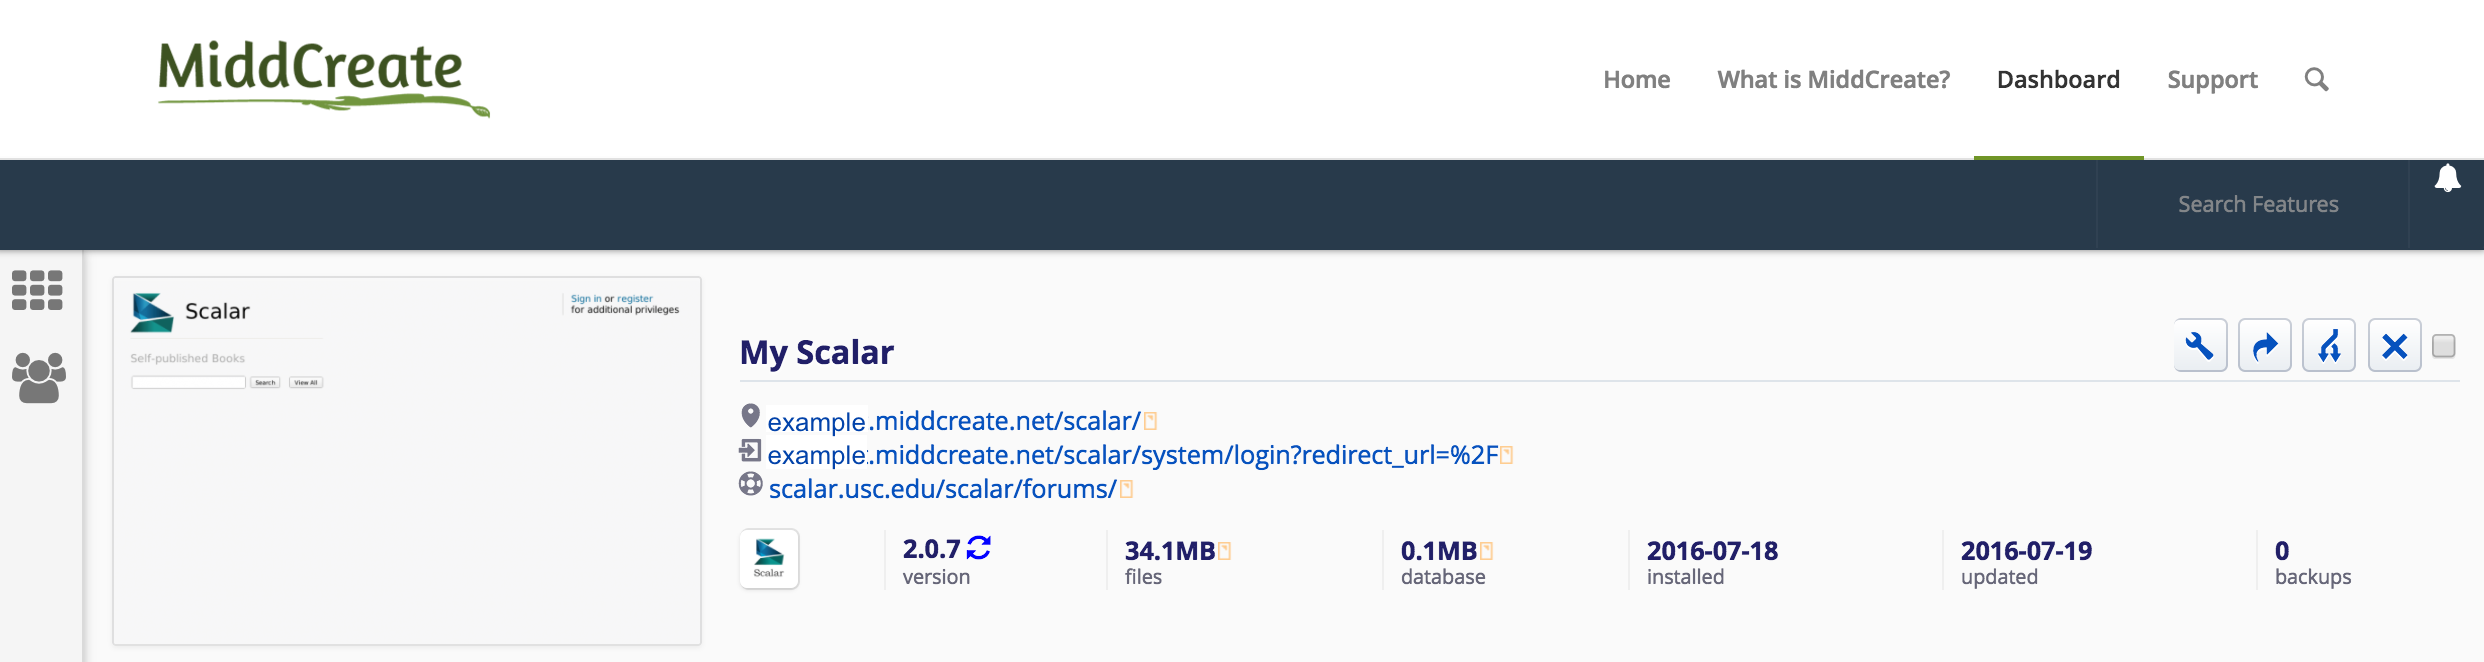
7. The installer will take just a few moments to install Scalar and a progress bar will keep you updated. When it is complete you will see links to your new Scalar site.

scalarlinks

8. Congratulations, you have now completed the installation of Scalar! Click the top link to log in to your Scalar installation.

Using Scalar

You can learn how to use this application in the official Scalar 2 User Guide or Scalar 1 User Guide depending on which format version you choose. These support guides will help you get started and begin publishing with Scalar.

LimeSurvey

LimeSurvey is a survey making tool that allows you to easily create and execute a variety of assessments. Some of the features available in this application are:

  • Unlimited number of surveys, questions, and participants
  • Multi-lingual surveys: 80 different languages supported
  • Surveys can be shared via a link, or you can send tokens so only specific users can access the survey
  • Send invitations and reminders by email
  • Ready-made importable questions & surveys
  • 28 different question types with more to come
  • Conditions for questions depending on earlier answers
  • Anonymous and non-anonymous surveys
  • Integrate pictures and movies into a survey
  • Printable versions of your survey

Installing LimeSurvey

1. To get started you’ll need to log in to your control panel (https://domains.skidmore.edu/dashboard) using your Skidmore username and password.

sign in.001

2. Once logged in you’ll be at the homepage of your control panel. Navigate to the Installatron by looking under the ‘Software’ section or typing “Installatron” into the search bar at the upper right corner of the page.

installatron new.001

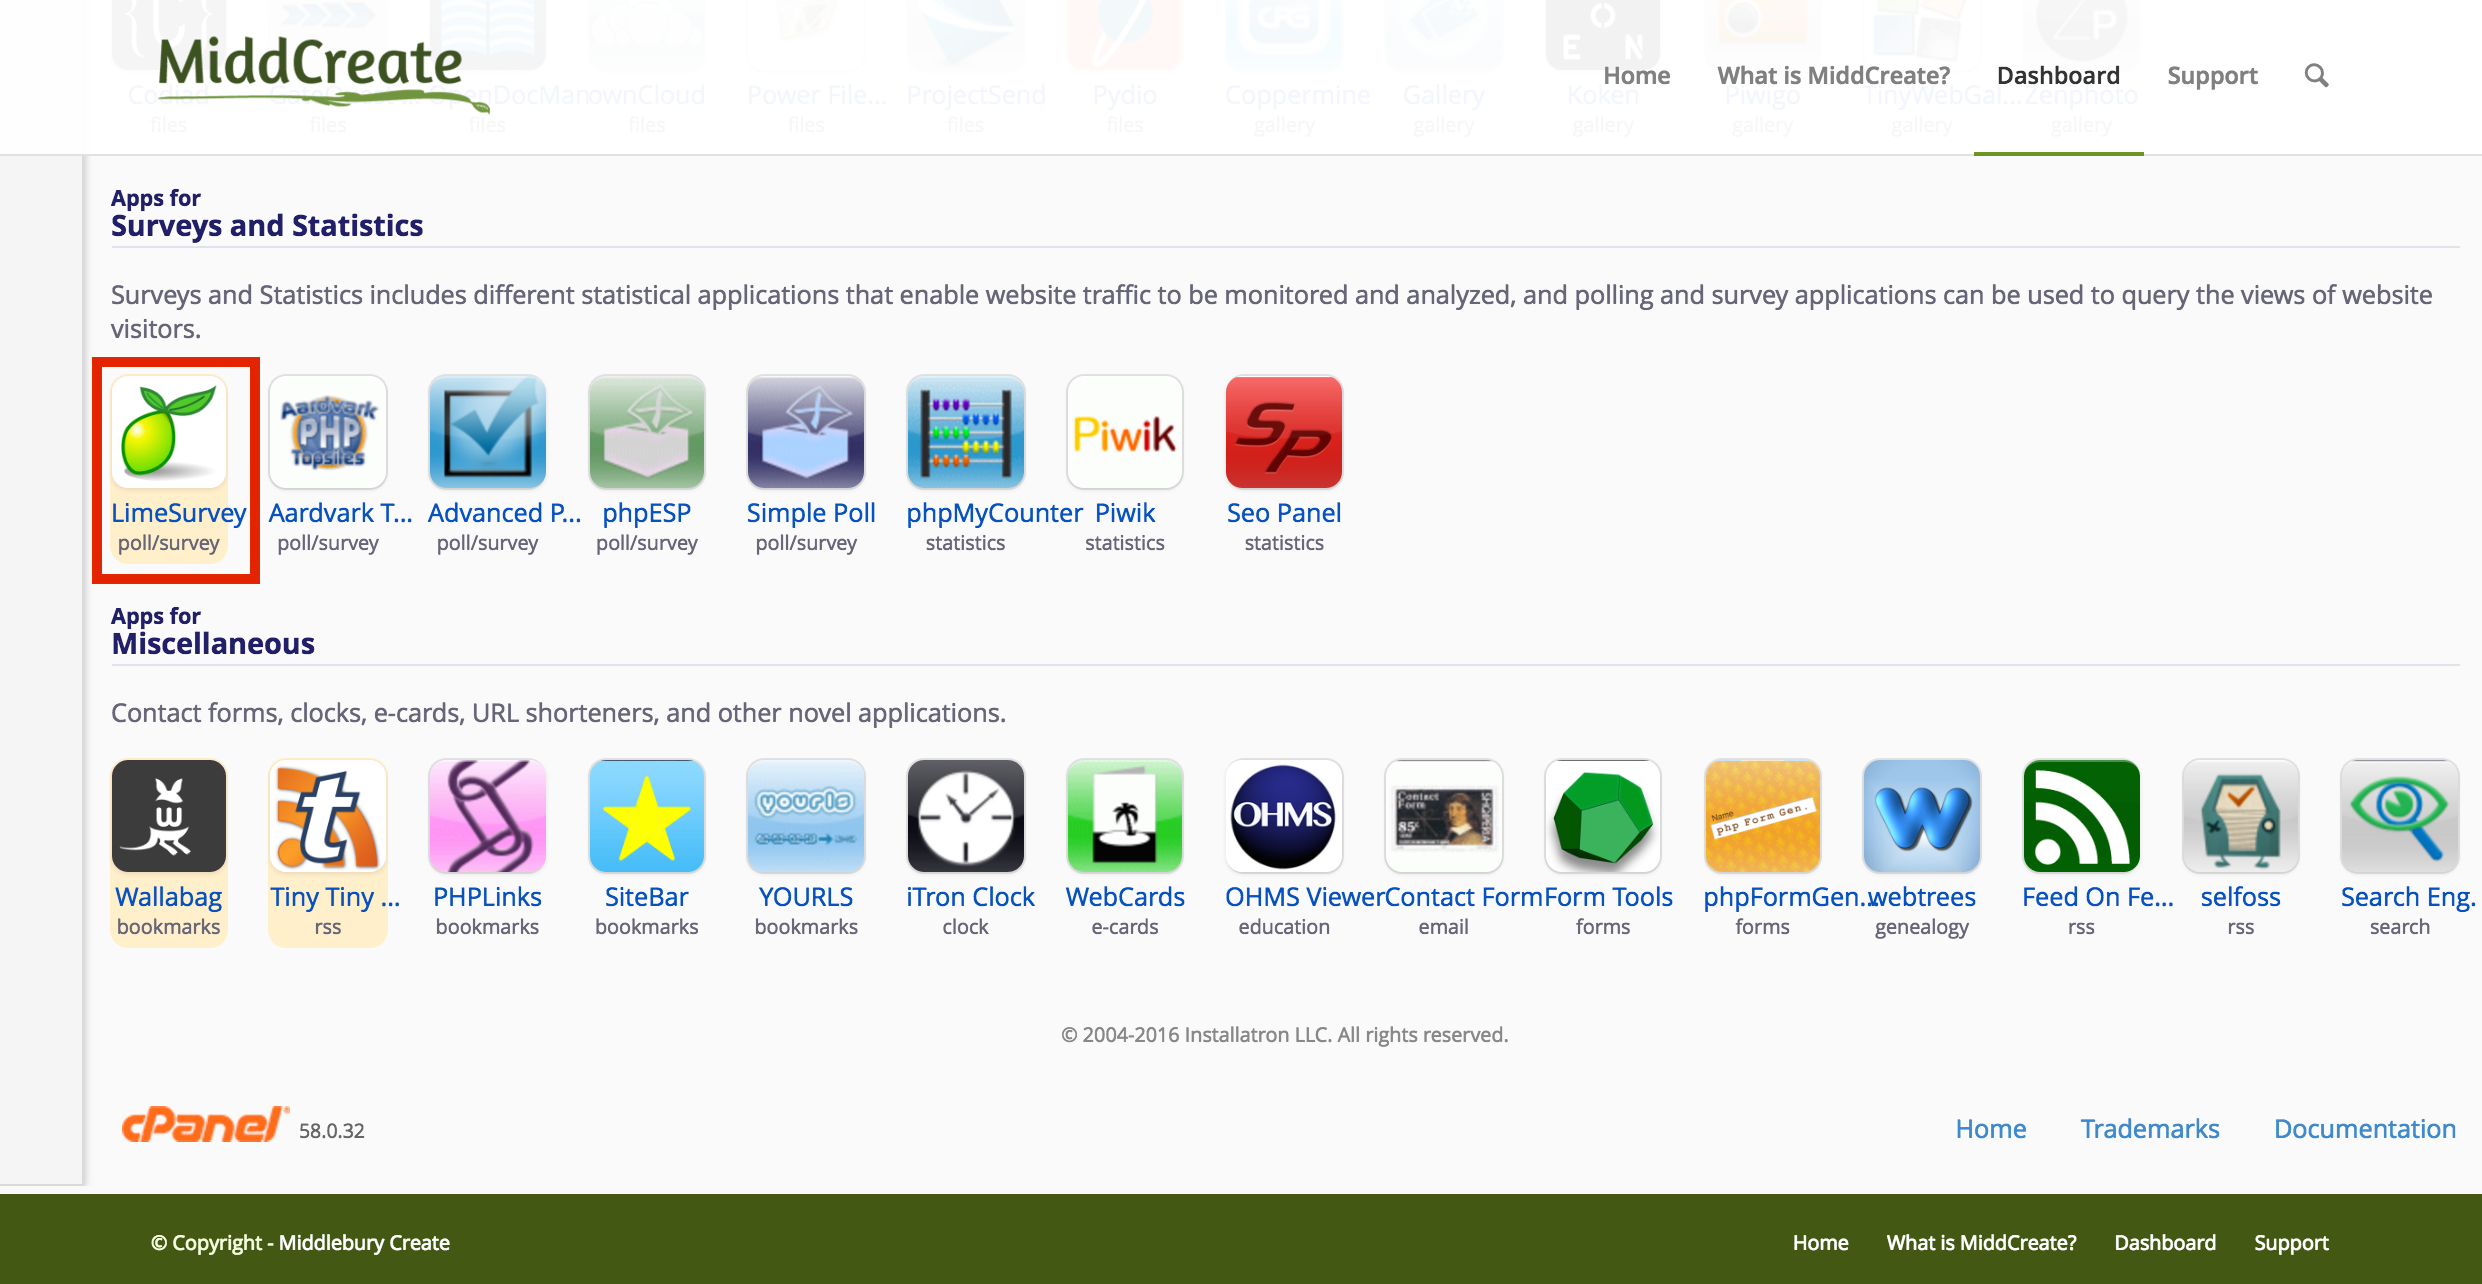
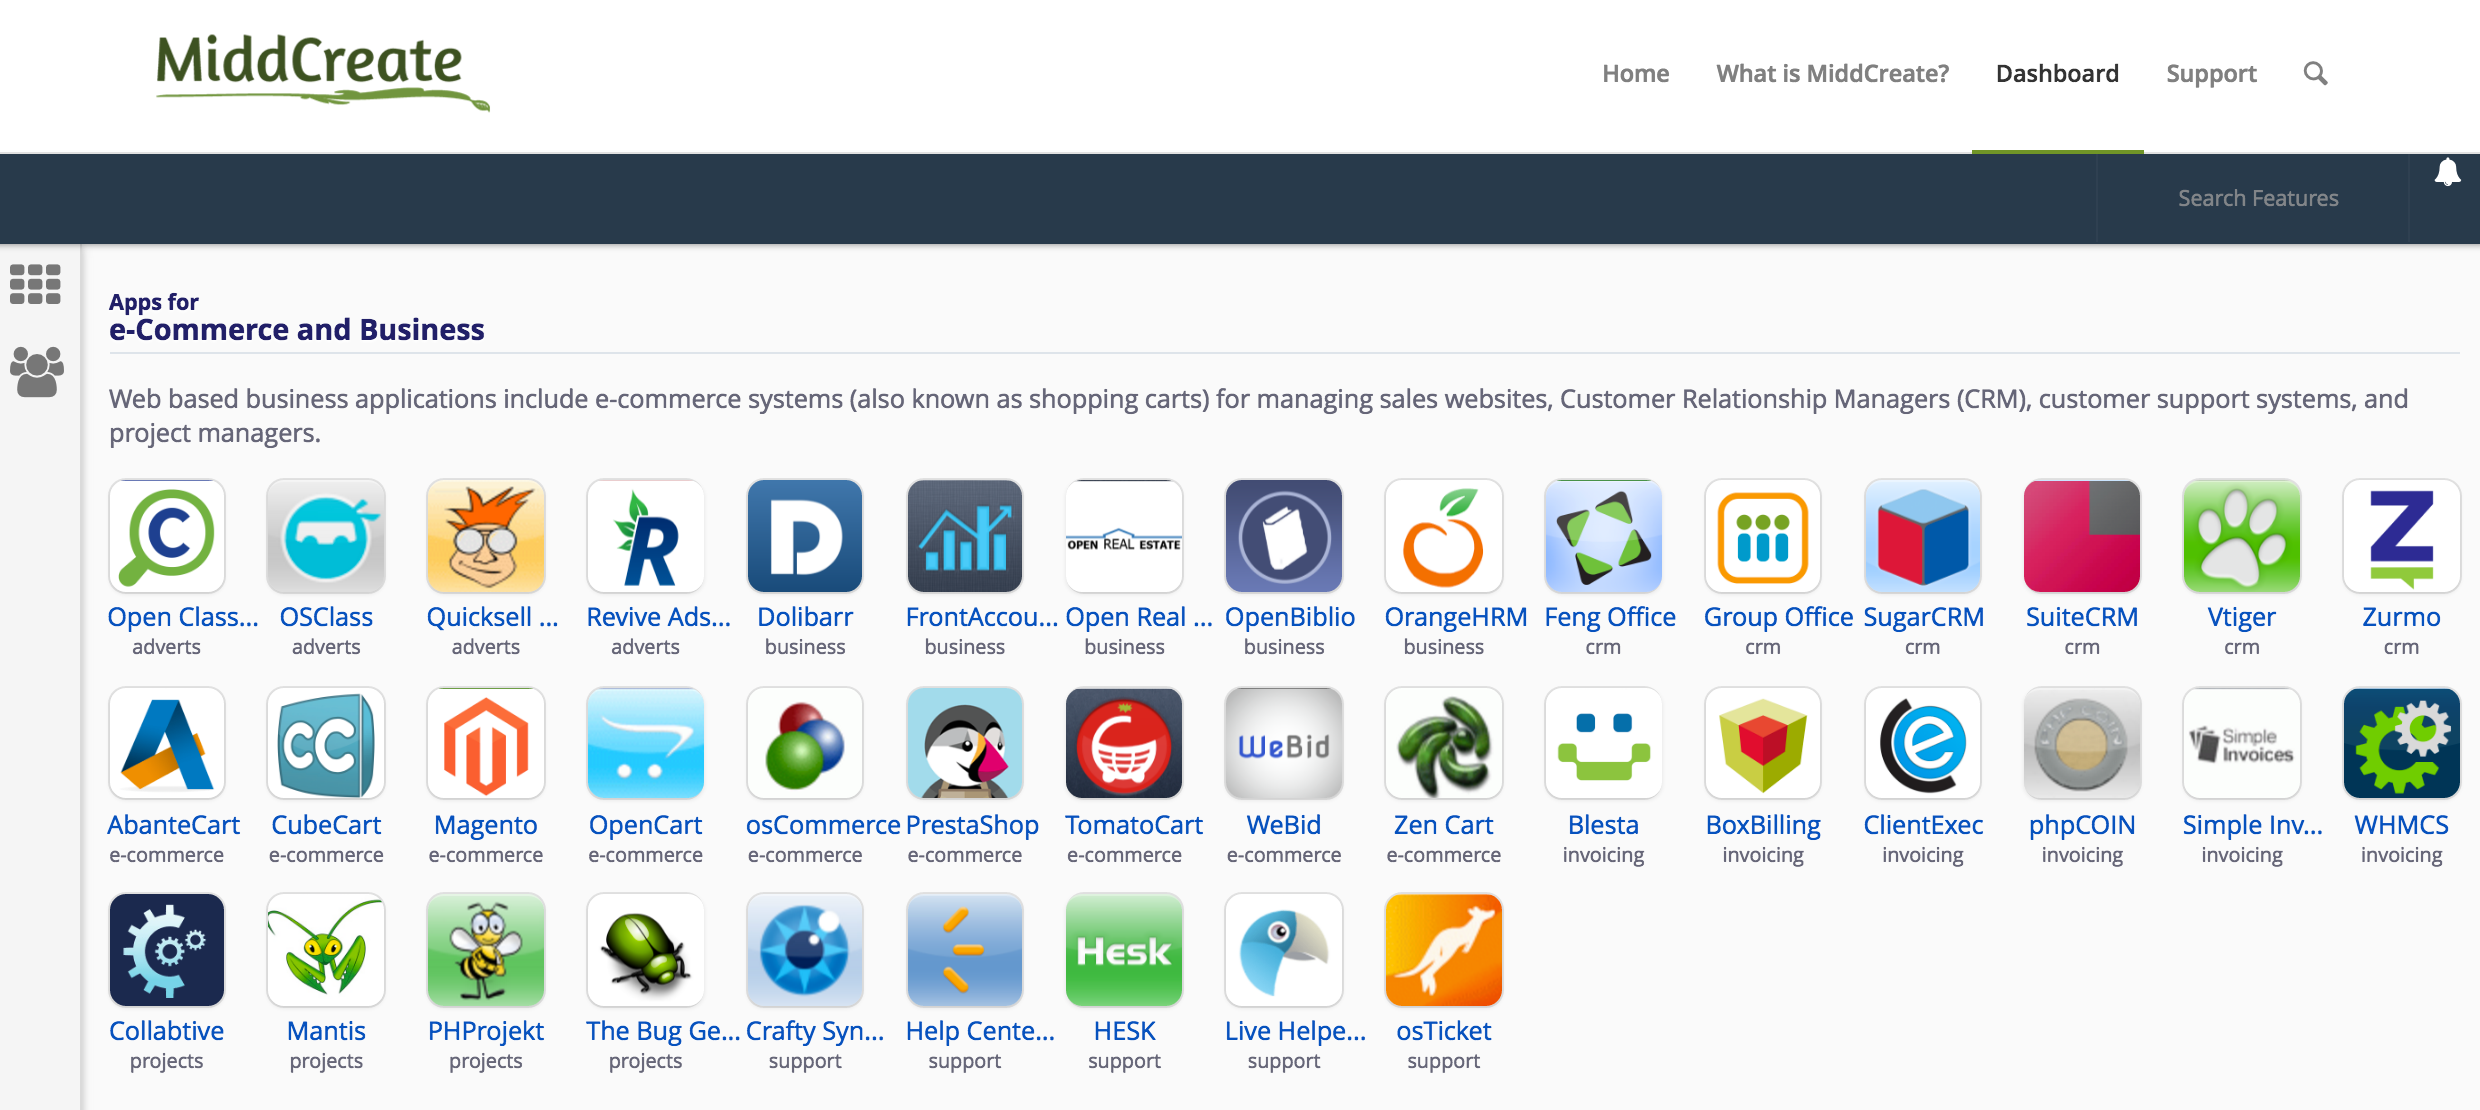
3. Click on the Applications Browser tab (the one with the star). Then select LimeSurvey under the ‘Apps for Surveys and Statistics’ section.

limesurvey

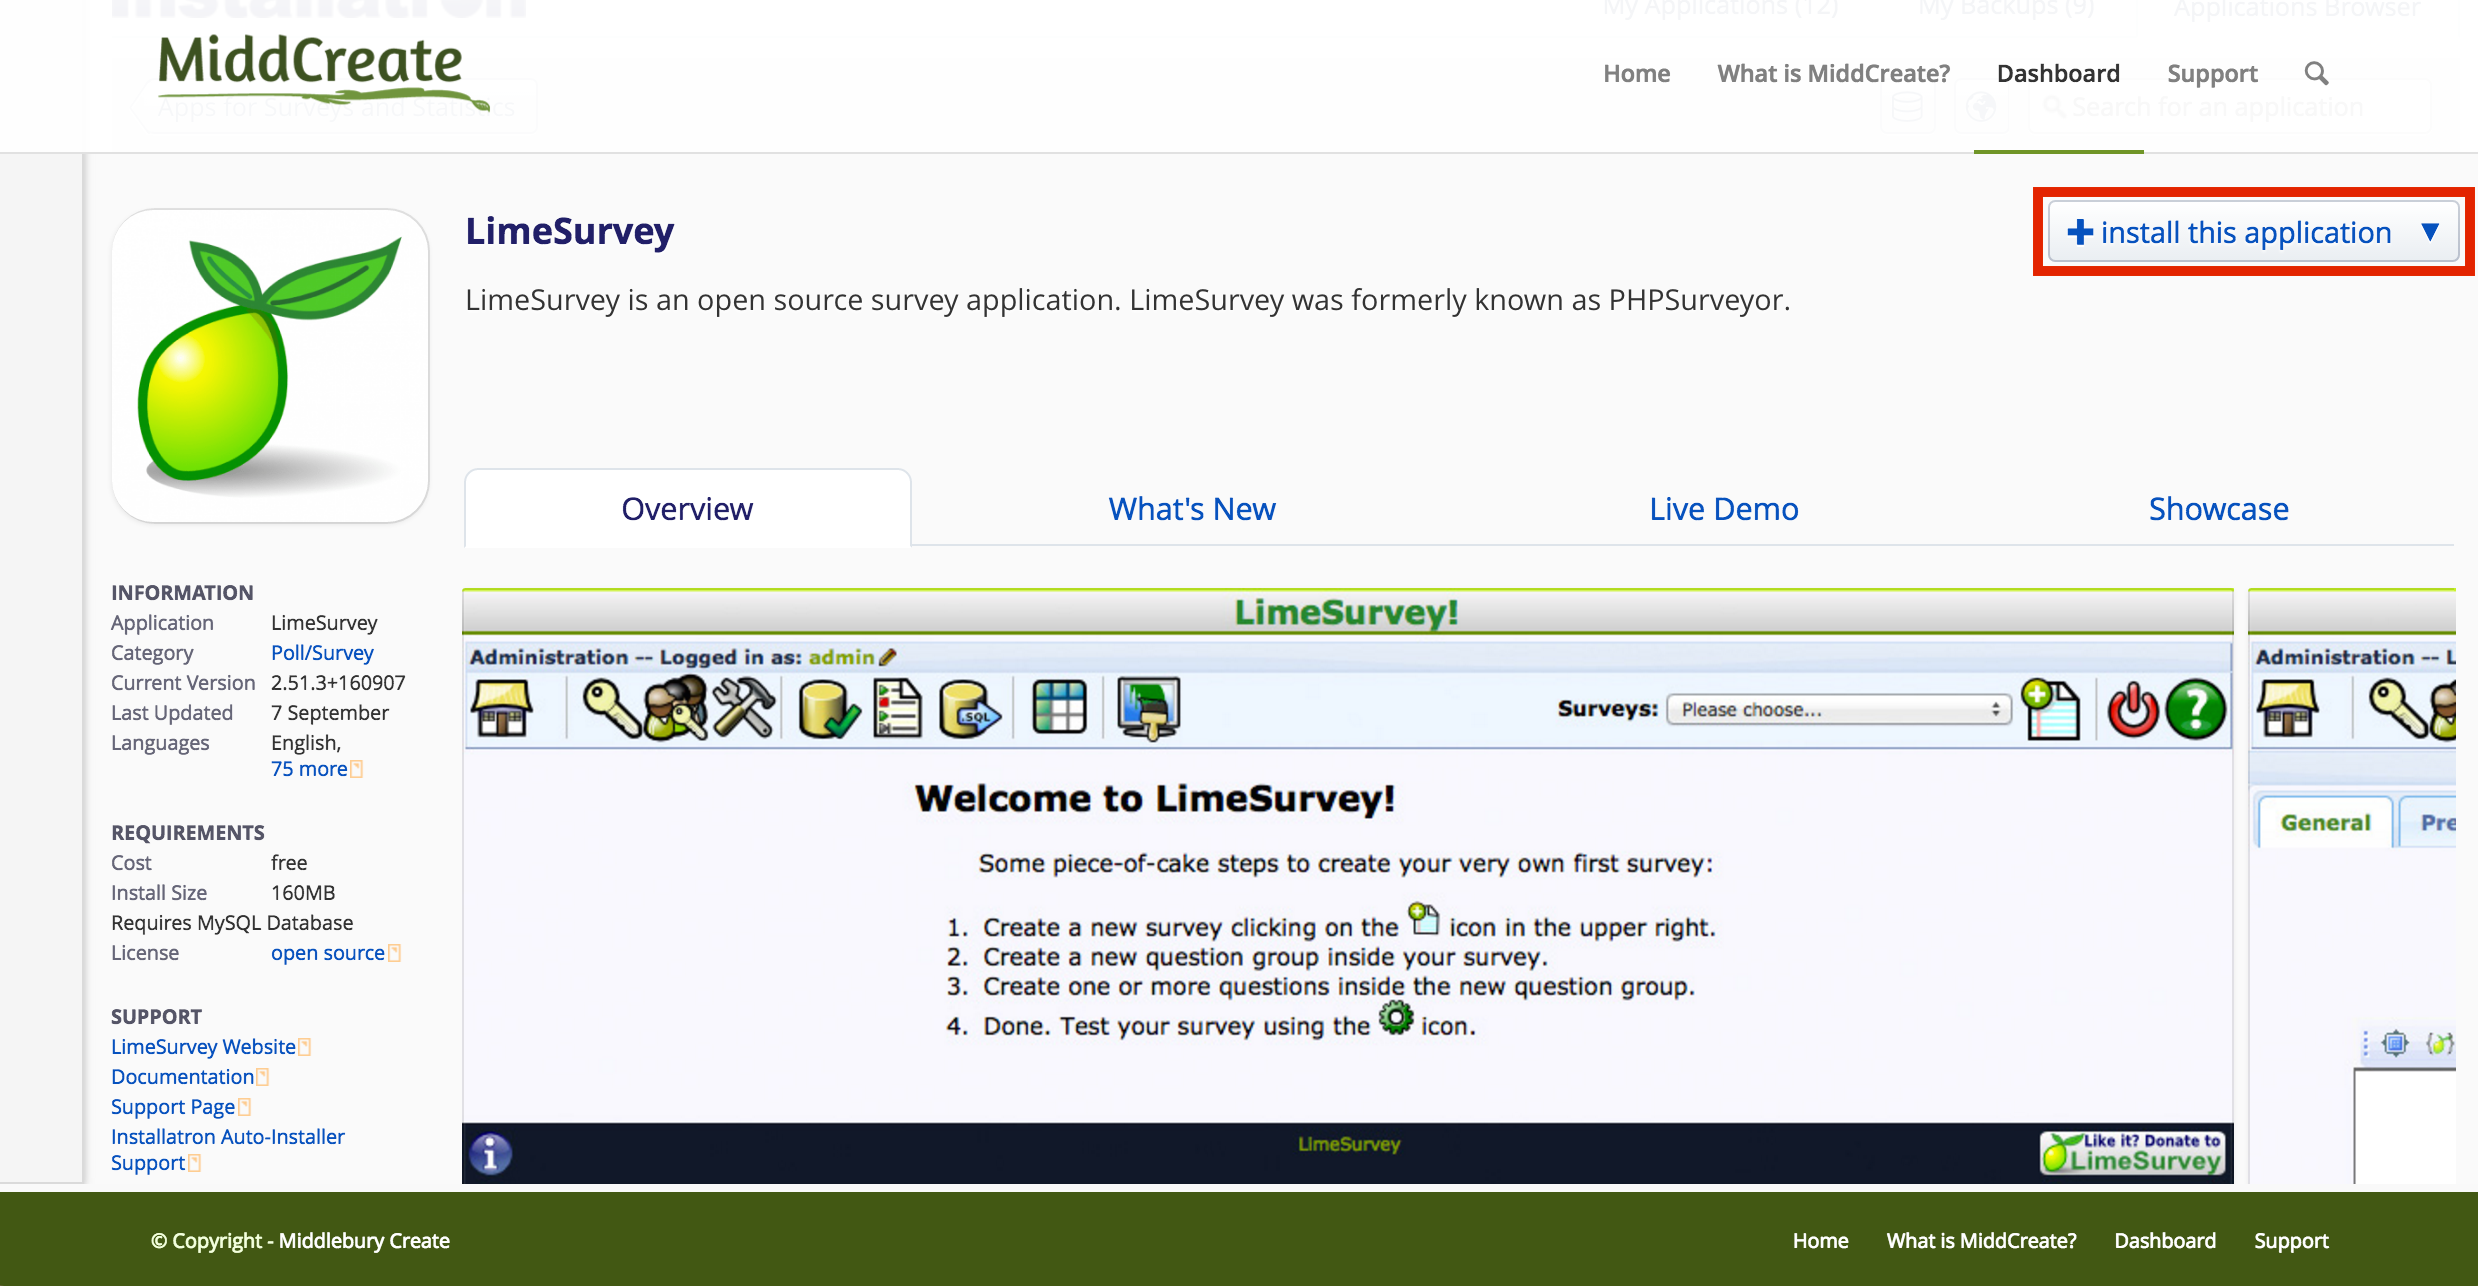
4. This page gives you more information about the LimeSurvey software. To begin the install, click ‘install this application’ in the upper right-hand corner.

lmsvy1


5. On the next page the installer will ask for some information about this install. The first thing you’ll want to do is decide where to install it. If you’re wanting to install LimeSurvey on your main domain, you can leave the directory area empty. If you created a subdomain, you can select it from the dropdown menu. You also have the option of installing LimeSurvey in a subfolder by typing in the folder name in the Directory field. Click here for more information about subdomains and subfolders.

install omeka.001

6. By default the installer will automatically backup your website and update it anytime a new version comes out. While we recommend you keep this option, it is possible to only do minor updates, or turn them off completely. The installer will also create a database for you automatically, but if you’ve already created one for this website you can choose Let me manage the database settings and enter the details. Click Install to continue. omeka database.001

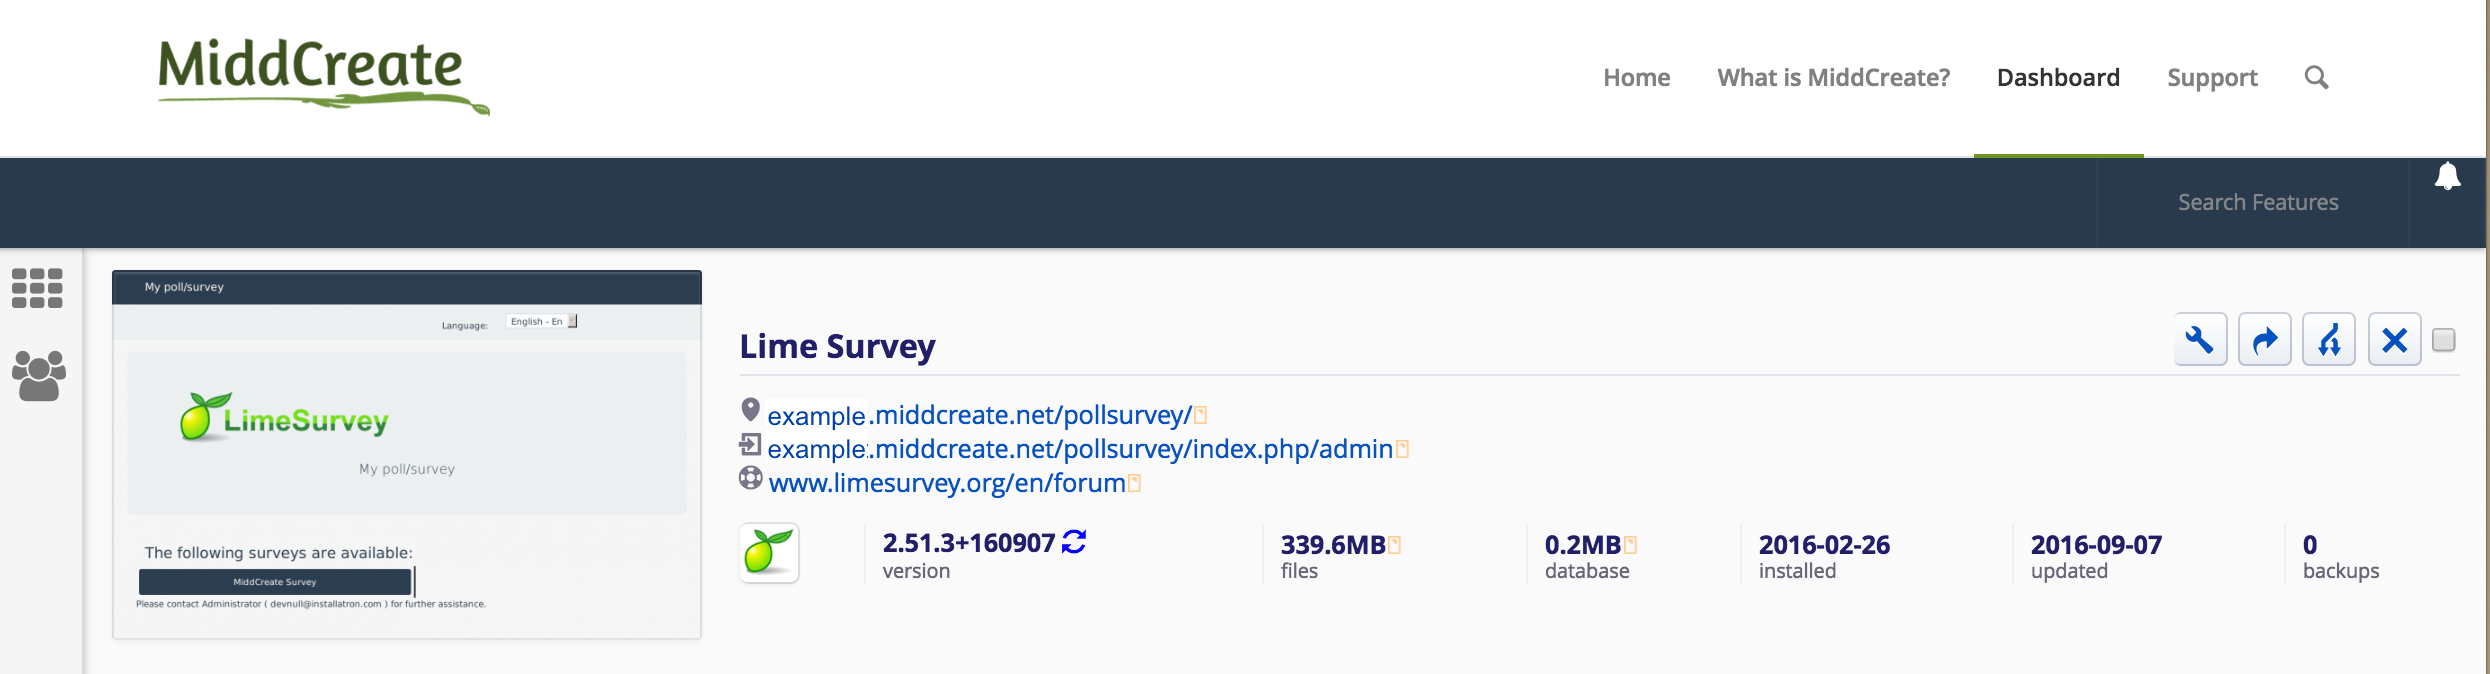
7. The installer will take just a few moments to install LimeSurvey and a progress bar will keep you updated. When it is complete you will see a link to your new LimeSurvey site as well as a link to the backend administrative section below it.

limesvy2

8. Congratulations, you have now completed the installation of LimeSurvey! Click the administrative link to log in and begin creating surveys with your new LimeSurvey installation.

Using LimeSurvey

You can learn how to use this application in the official LimeSurvey Manual. This support documentation wiki can help you get started by showing you how to do the following:

E-commerce Applications

ecommerce

Skidmore Domains’s Installatron offers 9 e-commerce applications. However, members of the Skidmore College and Skidmore Institute of International Studies community are not allowed to utilize these applications to actually conduct sales or make money.

In Skidmore’s Web Policies under ‘Guidelines for All Web Pages’, section 1b, it states:

Unauthorized use of Skidmore College’s Web sites for commercial purposes is prohibited. Personal or institutional Web pages may not be used for direct advertising for personal profit or gain.

Under section 1d of the ‘Guidelines for Student Organization Sites, Personal Pages and Postings’, it further states that:

The College will review complaints, questions, and concerns regarding allegations of copyright infringement, misuse of intellectual property, harassment, use of College Web resources for commercial purposes, and other legal issues. If the complaint is valid, the College will contact the student organization’s Web editor and request immediate revision of the Web page and/or removal of inappropriate materials in compliance with College policies, intellectual property law, and guidelines for responsible use of computing resources. The College may shut down the Web site if there is inadequate or no response from the student organization. Illegal, irresponsible, or unethical activities may result in loss of privileges or penalties consistent with the judicial procedures and policies of the College.
E-commerce applications remain available in the Installatron solely for educational purposes, so that students, faculty, and staff can explore them in order to expand their knowledge of digital tools. Please feel free to install and experiment with them on your domain, but be aware that inappropriate usage could lead to a request to desist or result in your site being shut down.

Backup Wizard

The cPanel has a Backup Wizard that lets you easily backup and restore all or parts of your domain files and databases.

  1. Login to domains.skidmore.edu.
  2. In the Search Box at the top of the page, search for “Backup Wizard”, or under Files click on Backup Wizard.
Skidmore Domains docs edits.001

backup wizard

3. If you click the “Backup” button, you will have the option to create a full or partial backup. A full backup will create an archive of all the files and configurations on your website. You can only use this to move your account to another server, or to keep a local copy of your files. You can’t restore full backups through your cPanel interface. In order to restore files, you’ll need to download partial backups.

When You Leave

You will lose access to your Skidmore Domains domain six months after you graduate (or otherwise discontinue) from Skidmore. You can keep everything exactly the same while you still have access to your Skidmore email, which is for 6 months after graduation. However, when you lose access to your Skidmore email, you no longer have access to your Skidmore Domains cPanel.

You then have a number of options, with the ultimate goal to transition your account to one that is no longer managed by Skidmore or connected to your Skidmore email. 

The easiest option is to migrate your site off of Skidmore Domains directly to Reclaim Hosting. This option keeps everything exactly the same on the back end, but just moves your content over automatically from the Skidmore Domains servers to the Reclaim Hosting Customer servers. Reclaim Hosting will give you the option to purchase your own domain name (so it will no longer be yourdomain.domains.skidmore.edu) and it will migrate the site for you – easy peasy. You don’t have to do any of the migration work yourself. After that point, your contact for troubleshooting will be “support@reclaimhosting.com.” The most popular plan through Reclaim is $30/year for 2GB of space, which is a very competitive deal.

Other options are to download your entire site to store on your computer, move everything over to another hosting provider, or—if you use WordPress—to export your site’s content, import it to WordPress.com for free, and re-do some of the formatting that doesn’t transfer over. (More info here.)

Using Reclaim Hosting

Skidmore Domains is hosted through Reclaim Hosting, a company that started out of the University of Mary Washington. Through our special partnership with them, you’re eligible to have your domain and content automatically migrated to a full hosting account for free for the first year. See this link for more details.

Just sign up for your own domain, submit a support ticket, and they’ll do the migration for you. You won’t have to provide any login information since they control the servers on both sides.

To sign up for your own Reclaim Hosting domain:

1. Login to domains.skidmore.edu.

2. Go to Migration Information under Manage Your Account in the top navigation menu.

migration info.001

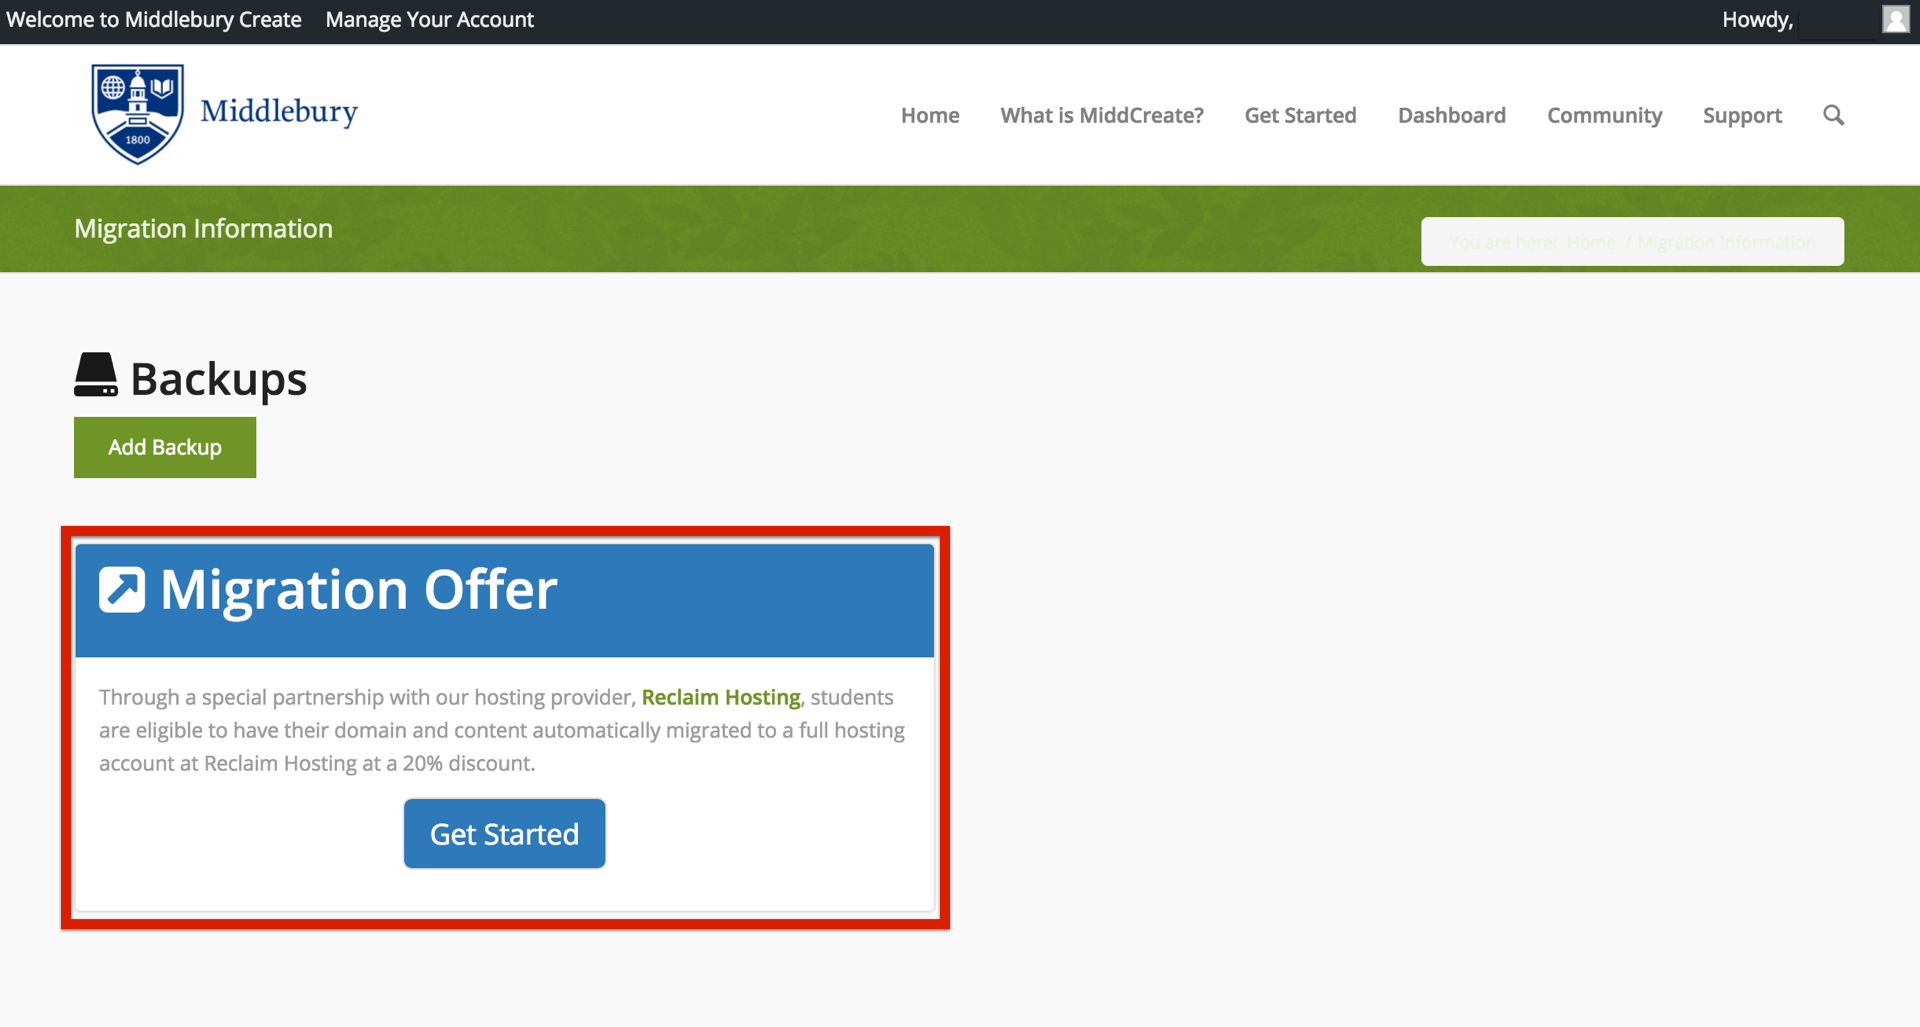
3. Click on Get Started in the Migration Offer box.

migration offer.001

4. You will be given the option to 1) register a new domain, 2) transfer your domain from another registrar, or 3) use your existing domain and update your nameservers.domainname.001

If your site’s URL ends in domains.skidmore.edu, and you have never used a different URL or purchased hosting from somewhere else, the Register a new domain option allows you to get your own personal domain with Reclaim Hosting (outside of Skidmore Domains). Your site will no longer be located at “yoursite.domains.skidmore.edu” and you’ll be able to purchase a new URL.

If you have purchased (or intend to purchase) a URL from a different hosting company, but still want your site to be hosted with Reclaim Hosting, select the I will use my existing domain and update my nameservers option. Your site will be migrated to a personal Reclaim Hosting account, but then you will have to update the information that tells the other hosting company (that you got your URL from) where your site is located. It’s possible to get your hosting and URL from two separate companies, but it’s often easier and cheaper to get them together.

If you already have a site that’s hosted somewhere else, and want to transfer everything to a personal Reclaim Hosting account, select Transfer your domain from another registrar.

Other Hosting Providers

If you don’t want to continue with Reclaim and would rather use a different hosting company, you can download all your site files independently, purchase a URL, and upload the files to your new domain through FTP.

DokuWiki

DokuWiki is a standards compliant, simple to use wiki, mainly aimed at creating documentation of any kind. It can be used as an encyclopedia of knowledge or resources, for outlining projects, or to draft documents. Some of the features it includes are:

  • Simple syntax
  • Unlimited page revisions
  • Track recent changes
  • Colored side by side diff support
  • Uploading and embedding of images and other media
  • Content can be categorized in namespaces, easily browsable through an automatic index
  • Straightforward configuration
  • Section Editing allows editing of small parts of a page
  • Toolbar and access keys make editing easy for both beginners and professional
  • Easy navigation through breadcrumbs
  • Automatic table of contents generation
  • Locking to avoid edit conflicts
  • Automatic save to avoid content lost during editing
  • Extended Access Control Lists
  • Support for over 50 languages

1. To get started you’ll need to log in to your control panel (https://domains.skidmore.edu/dashboard) using your Skidmore username and password.

sign in.001

2. Once logged in you’ll be at the homepage of your control panel. Navigate to the Installatron by looking under the ‘Software’ section or typing “Installatron” into the search bar at the upper right corner of the page.

installatron new.001

3. Click on the Applications Browser tab (the one with the star). Then select DokuWiki under the ‘Apps for Content Management’ section.

dokuwiki

4. This page gives you more information about the DokuWiki software. To begin the install, click ‘install this application’ in the upper right-hand corner.

dokuwiki1

5. On the next page the installer will ask for some information about this install. The first thing you’ll want to do is decide where to install it. If you’re wanting to install DokuWiki on your main domain, you can leave the directory area empty. If you created a subdomain, you can select it from the dropdown menu. You also have the option of installing DokuWiki in a subfolder by typing in the folder name in the Directory field. Click here for more information about subdomains and subfolders.

install omeka.001

6. By default the installer will automatically backup your website and update it anytime a new version comes out. While we recommend you keep this option, it is possible to only do minor updates, or turn them off completely. The installer will also create a database for you automatically, but if you’ve already created one for this website you can choose Let me manage the database settings and enter the details. Click Install to continue. omeka database.001

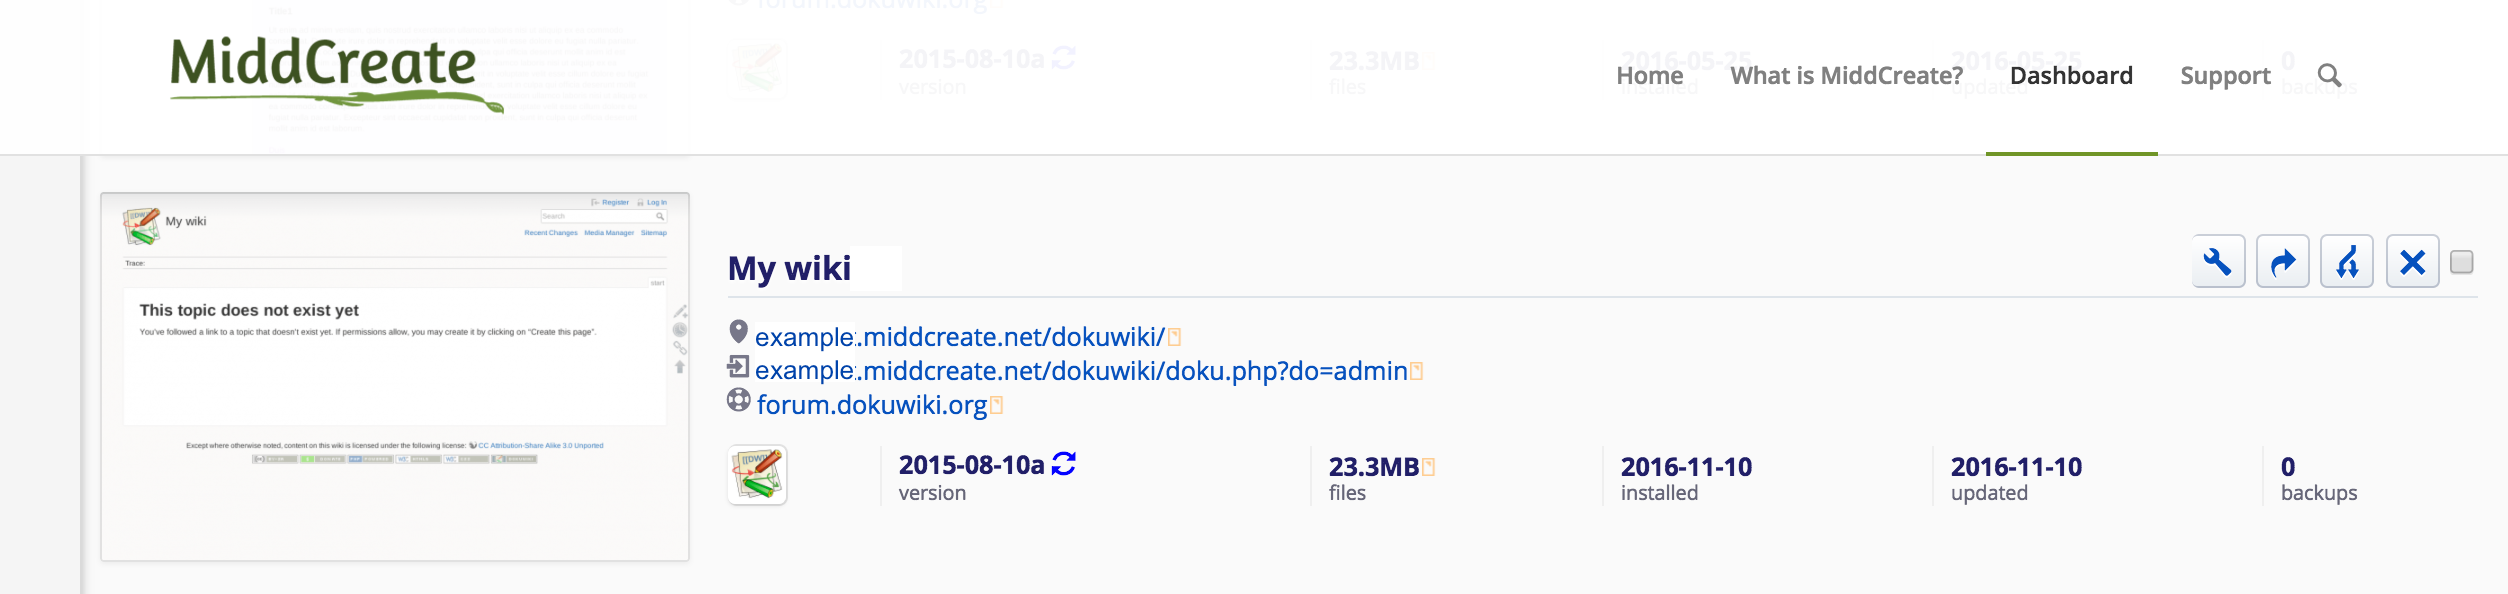
7. The installer will take just a few moments to install DokuWiki and a progress bar will keep you updated. When it is complete you will see links to your new DokuWiki site.

dokuwiki3

8. Congratulations, you have now completed the installation of DokuWiki! Click the top link to log in to your DokuWiki installation.

Using DokuWiki

You can learn how to use this application in the official DokuWiki User Manual, including how to write in wiki syntax when editing pages. These manuals will help you get started and begin building your DokuWiki.